Fougasse (originally known as "fogatza") is a French flatbread originating from Provence. This no knead fougasse looks complicated and fancy, but is very simple to make and is a perfect bread for tearing and sharing with friends and family.
Jump to:
What is Fougasse bread?
Fougasse, or Provencal Bread, is a wonderful bread for sharing. Or, if you're like me, you don't share it, you eat half in one sitting. Most of the time, this bread is happily passed around the table for everyone to tear off a chunk with their meal.
Fougasse can be likened to Italian Focaccia in its texture and flavours, although, it is generally thinner, has more of a crust on top and uses less olive oil. It also tend to be a lower hydration dough unlike some focaccias which can be upwards of 85% hydration. Traditional Fougasse often uses anchovies, olives, herbes de Provence, and or cheese for flavour, but it can also be kept simple and flavorful with chunky sea salt, garlic powder (like this recipe) and a slather of olive oil. Moreover, roasted red peppers, sun dried tomatoes, roasted garlic or fresh herbs also make excellent additions.
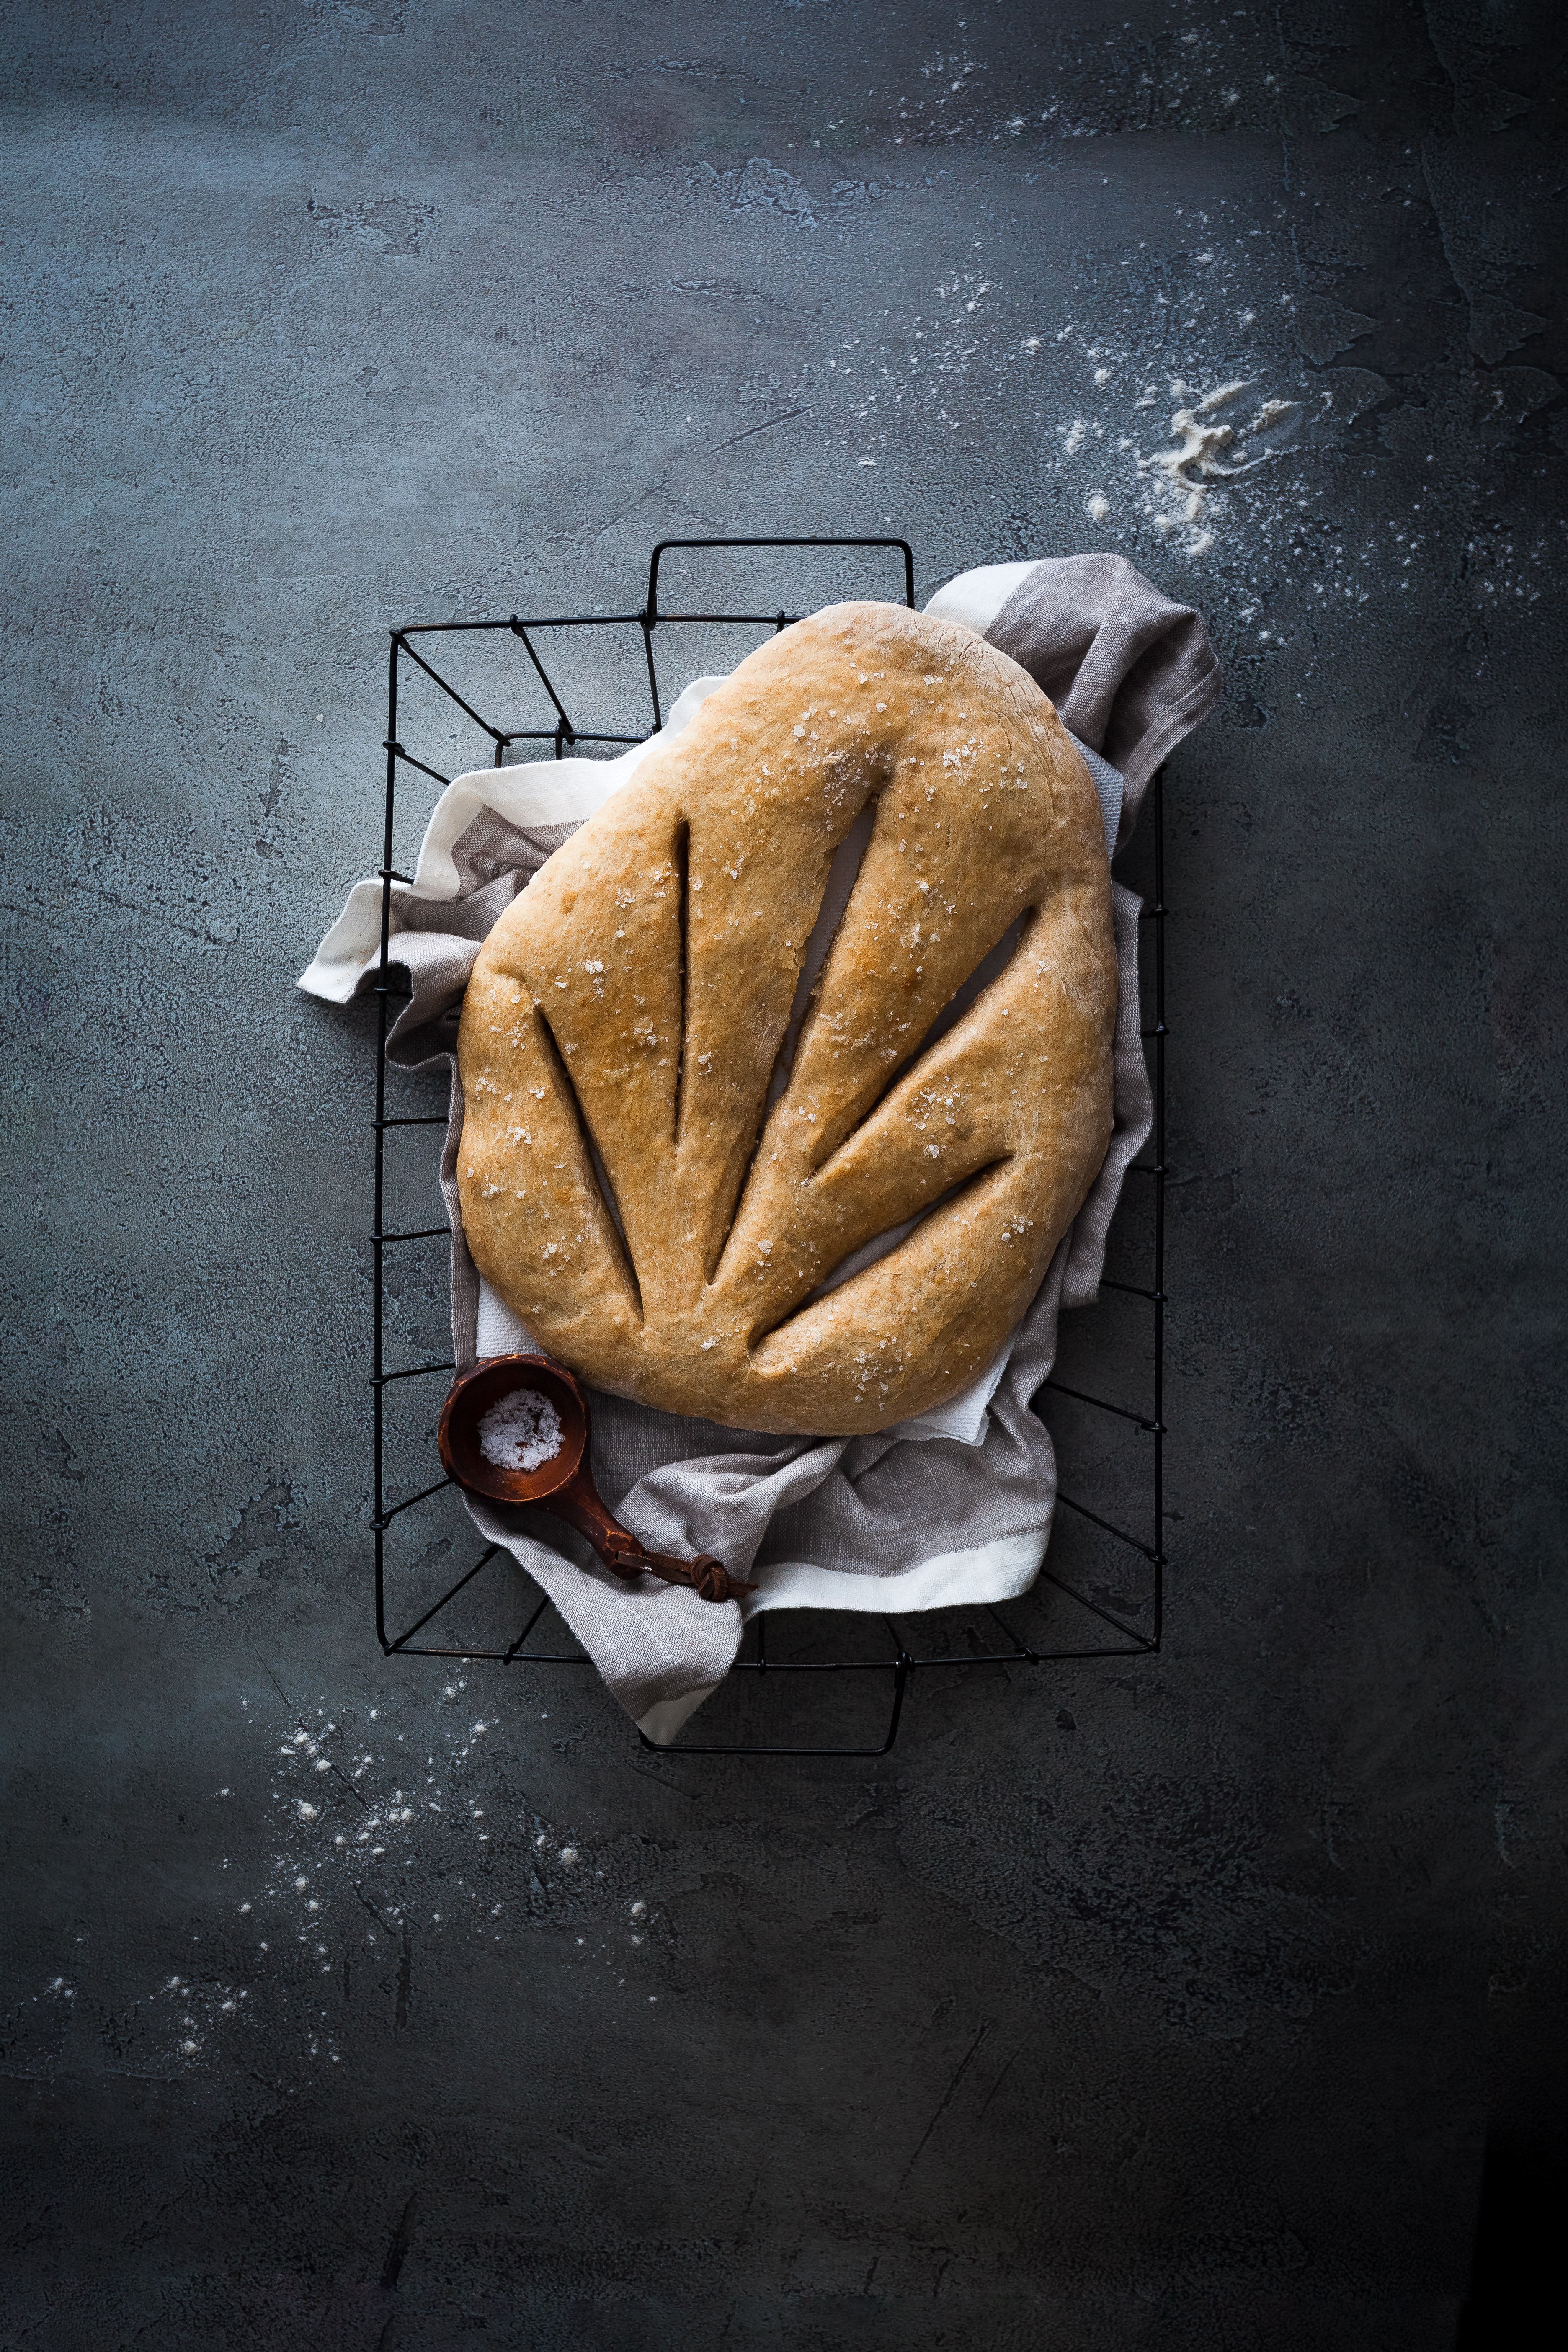
Traditionally, Fougasse is shaped into a tapered leaf (or sheaf of wheat) with slashes or holes in the middle of the bread, however, you can shape Fougasse however you like—don't listen to anyone that says it needs to look a certain way. It's a great bread to bring for sharing at potlucks or to enjoy with family at home.
Reasons to make this recipe
Like most no knead breads, this no-knead fougasse is exceptionally easy to make with very little active time involved. Overall, this recipe comes together quickly and can be ready for baking with an 8 hour proof (although, I have been able to proof this bread in 6 hours during warmer months). Fougasse is also nice because unlike other breads, it doesn't require a second rise. Moreover, it is a fairly forgiving recipe with plenty of flavouring options, other than garlic, so you can create something to suite your preferences.
This recipe is a culmination of several I've been making over the years and is loosely based off of Jim Lahey's very popular no knead bread recipe. I use a small portion of spelt flour in this recipe which I find adds an additional layer of flavour (somewhat rich and nutty), but feel free to exchange it for more all-purpose or bread flour in equal measure.
While fougasse is a traditional bread, it's not very common and tends to wow guests with it's complicated looking shape. Nevertheless, fougasse patterns are very simple to make.

Ingredient notes and substitutions
For the full detailed ingredients along with the quantities of each, please visit the recipe card below.
Warm filtered water: ideally you want to have water that is roughly 100°F or close to it. Warmer water helps activate the yeast and starts the proofing process. Just don't use water with a temperature higher than 115°F as this can deactivate yeast, especially so for active dry yeast.
Active dry yeast: you can also use instant yeast, however I would avoid instant yeasts that are marked as 'rapid-rise' or 'fast acting' as these will result in a much quicker proof time which can lead to less flavour and gluten development and over-proofed dough. The longer a dough can proof the better the flavour and the chewier it will be. If you wish to substitute regular instant yeast, you will not need to proof it; instead add it to the flour mixture and then proceed with adding the water and oil thereafter.
Kosher salt: I prefer kosher salt here, however, you can use sea salt or pink salt in equal measure with little difference in flavour and rise (I have made this recipe with all three salts and found little to no difference).
Extra virgin olive oil: this is used both in the dough and for basting. Olive oil adds softness/moisture and flavour to the crumb.
Garlic powder: this adds the garlic flavour. Don't use fresh garlic as this will retard or completely deactivate the yeast in the dough and prevent it from rising.
All purpose flour: you can use bread flour in equal measure, however, this will increase the gluten content of the bread and can make for a dough that is slightly more springy. As a result, more time will need to be taken to shape and create the slashes before baking, I have found. However, I have made this recipe with both all purpose and bread flour successfully.
Light spelt flour: I find spelt or whole wheat adds a nice depth of flavour to the final fougasse. However, the additional of spelt or whole wheat are optional. If you would prefer, use more all purpose or bread flour in exchange.
Coarse sea salt: this is added to top of the dough prior to baking for flavour and texture.
Step by Step
For the full detailed instructions, please visit the recipe card.
STEP 1: Combine the water and yeast and let stand for 5 minutes or until bubbly. Add in the olive oil.
STEP 2: Combine the flours, salt and garlic powder and mix until a rough dough ball forms.
STEP 3: Cover and let rise in a warm place for approximately 8 hours or until doubled in size. There are notes below included for doing an overnight proof.
STEP 4: Preheat the oven to 450℉. Punch down the dough to release the air and then form it into a ball and turn it onto itself a few times.
STEP 5: Flour a large piece of parchment paper and place the dough onto it. Let the dough rest for 10 minutes, then lightly flour the top.
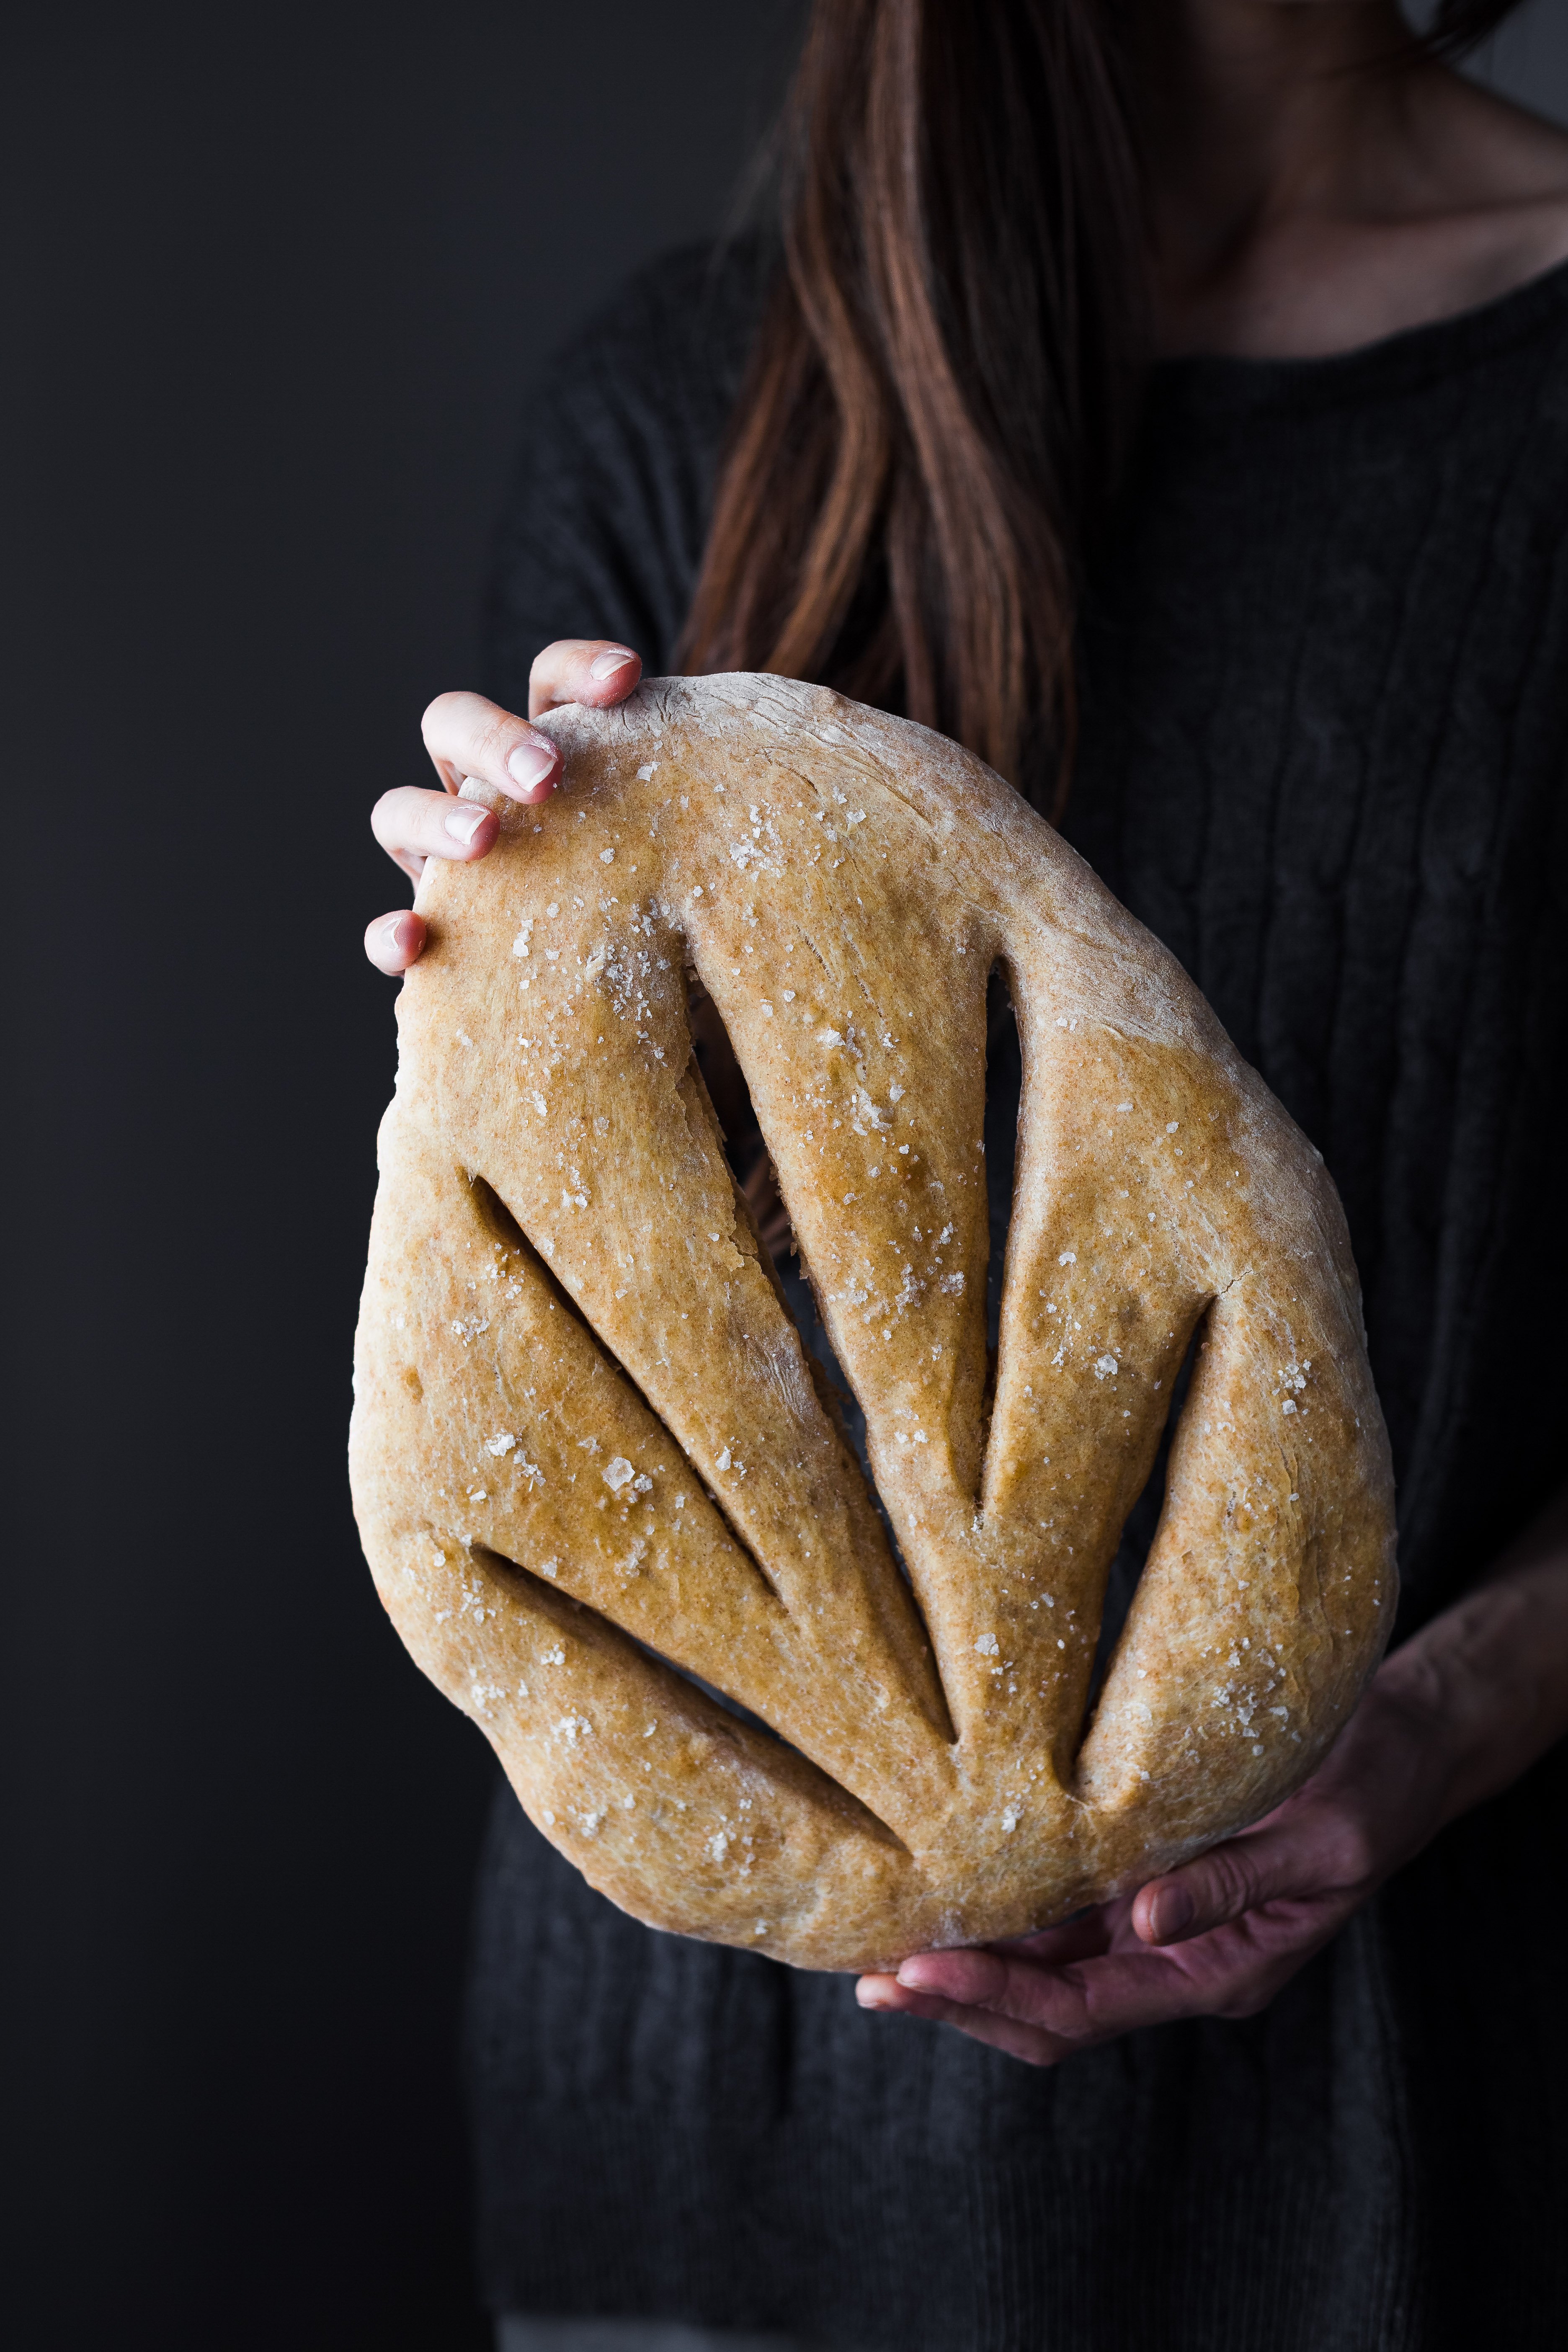
STEP 6: Form the dough into a tapered leaf shape about a ½" thick.
STEP 7: Cut the dough with several lines to form a leaf vein pattern.
STEP 8: Baste the top with olive oil and sprinkle coarse salt.
STEP 9: Slide the parchment paper & dough onto a large baking sheet and bake in the preheated oven for 20-25 minutes, or until golden brown.
STEP 10: Baste it with more olive oil and allow it to cool slightly before serving.

Overnight Rise Option
Prepare the fougasse dough as per the instructions, however, instead of proofing at room temperature, you will need to place the dough in a lightly oiled bowl, cover and place it in the fridge overnight or up to 24 hours. Just before baking, remove the dough from the fridge and allow it to warm up for about 10 minutes before shaping and baking per the recipe.
Important note about garlic
Again for the record, don't add fresh garlic to your dough! It took me several tests to get this recipe right and I had to learn the hard way that fresh garlic will kill yeast and result in a rather dense and lifeless bread—a "flat-bread" in every sense of the word.

Helpful Tips
- Make sure the yeast is fresh: Active dry yeast is rather perishable having a usual shelf life of about 6 months once opened. You can always test a small amount of yeast first to check for activity before proceeding with the recipe. If the yeast is past the best before date on the package, purchase new yeast.
- Use a kitchen scale: weighing the dough ingredients is far more accurate than using cups and spoons alone. The recipe card includes the weight measurements to help make sure you don't over or under measure the ingredients.
- Prevent Sticking: lightly flour your cutting utensil when creating the slashes to help prevent sticking.
- If the dough resists shaping: let it rest for 5-10 minutes and try again. This is especially helpful if you've chosen to proof the bread overnight in the fridge; colder dough can be harder to shape.
- Plunge the blade in deeply before cutting: you want the blade to go all the way through the dough before starting the cut; this will result in a neat and easy cut line.
- Pull the blade away from you: because the dough has tension, it's easier if you cut the dough pulling away from you. Start with the base of the dough closest to you and pull the blade outward towards the edge of the dough, turning the dough and parchment as needed to make it easier.
- Use your hands: while the dough will naturally spread open after each cut, you can use your fingers to help it along. Which leads me to the next tip...
- Make large enough holes in the dough: otherwise the holes will close up as the dough rises during baking. Enlarge the holes about 2-3 times more using your fingers and tugging at the edges of the shape to accommodate the additional size, if needed.
Storage and Make Ahead
Storage: Fougasse bread is best served the same day it is made, however, you can store it in an airtight container at room temperature for up to 2 days.
Freezing: the baked fougasse can be frozen whole or in portions. Wrap the loaf or portions well in plastic wrap and then place in a freezer safe bag; it should keep for up to 2 months this way. To thaw, defrost the fougasse in the fridge (this usually take 12-24 hours). To reheat, place a piece of aluminum foil over the top of the loaf to prevent over-browning the top and place in a preheated oven at 375°F for 8-10 minutes.

More Recipes
I loved my no knead garlic fougasse and enjoy making bread, try some of my other recipes below.
No Knead Maple Oat Spelt Bread
And don't forget the butter; my European Style Dairy-Free Butter is a classic.
If you made my no knead garlic fougasse bread please leave me a comment below with a star rating; it really helps others who are interested in making the recipe. For more from The Simple Green, follow me on Instagram, Facebook or Pinterest. Consider becoming a subscriber to receive emails of new recipes and posts.

No Knead Garlic Fougasse Bread
Ingredients
- 1 cup (230g) warm filtered water, (100°F)
- ½ teaspoon active dry yeast
- 1 teaspoon kosher salt
- 1 tablespoon extra virgin olive oil
- 1 teaspoon garlic powder
- 1 ½ cups (260g) all purpose flour, or bread flour
- ½ cup (70g) light spelt flour, or whole wheat flour
- olive oil for basting
- coarse sea salt for topping
Instructions
- In a small bowl, combine the water and yeast and let sit for 5 minutes of until foamy and bubbling on the surface. Add in the olive oil.
- In a large bowl, sift together the flours, salt and garlic powder. Make a well in the centre and pour in the yeast mixture. Using a wooden spoon or dough whisk, mix until a rough dough ball forms, making sure to scrape down the sides to ensure all the flour is incorporated.
- Drizzle a small amount of olive oil over top of the dough. Cover the dough and let rise in a warm place for about 8 hours or until doubled in size. See notes for overnight proofing instructions.
- Once the dough has doubled, preheat the oven to 450℉. Gently deflate the dough to release some of the air and then, using a spatula or clean hands, form it into a loose ball, turning it onto itself a few times (note that the dough will be fairly sticky).
- Flour a large piece of parchment paper and place the dough onto it. Let the dough rest for 10 minutes, then lightly flour the top. Using your hands or a floured rolling pin form the dough into a tapered leaf shape (sometimes referred to as a 'teardrop') about a ½" thick. If the dough resists shaping, let it rest for another 5-10 minutes and try again.
- Using either a pastry cutter, bread lame or sharp paring knife, cut the dough with several lines to form a leaf vein pattern (see photos). Because the dough has tension, plunge the blade all the way through the dough and then pull the blade away from you towards the edge, turning the dough and parchment as needed to make it easier. The dough will spread apart naturally on the cut lines, but use your fingers to increase the cuts about 2-3 times more.
- Baste the top of the dough with olive oil and sprinkle coarse salt.
- Carefully slide the parchment paper and dough onto a large baking sheet and bake in the preheated oven for 20-22 minutes, or until golden brown.
- Remove the fougasse from the oven and baste it again with more olive oil. Allow it to cool slightly before serving. Fougasse is wonderful served warm on its own or with olive oil and balsamic vinegar for dipping.
Notes
Nutrition
This is an approximation of the nutrition offered in this recipe, and is created using a nutrition calculator. I am not a nutritionist and cannot guarantee accuracy. If your health depends on nutrition information, please calculate again with your preferred calculator.
Disclaimer
all recipes on The Simple Green are developed and tested in a Canadian kitchen, at normal elevation, using electric appliances and ingredients available in Canada. Results may vary.
You nailed it 🙂
Thank you 🙂 Glad you like it xx
These PICTURES! And a four hour rise for no-knead?! Amazing. Can't wait to try this, Heidi!
Thank you, Alex 🙂 That means a lot! Yeah, I had this down to a 4 hour proof one day by using a dehydrator under the covered bowl!
I just made this for my family. It was a hit! Thank you!!
That's awesome, Kara! I'm happy to hear it and thanks so much for the feedback!
I am not an avid bread maker, though it is something I wanted to try my hand at. This recipe has such simple ingredients and steps! But even more importantly, it tastes so amazing! I'd never heard of fougassi bread. Making a French garlic flatbread seemed a bit intimidating, but I feel like if I can make this recipe, any one can! It's definitely a dreamy recipe I'll be making more often! And I'm hoping to try some other of Heidi's recipes soon!
This makes my day (again lol)! Thank you for giving my recipe a go and for being such a gem! I stoked you like it, Aileen 🙂
Xo
I feel like this recipe should come with a warning - once you try it and see how simple and ridiculously delicious it is, you WILL become a Fougasse Feign! Since first making this recipe, I have made 6 more loaves! ("some" to share.?)
Haha, oh that’s excellent! I’m so happy to hear it, Aileen 🙂
Like!! Thank you for publishing this awesome article.
LOVE this recipe. Turned out really well. I basted extra garlic on top before serving.
So happy to hear you like it, Jeona!
I have never made flatbread before and wasn't sure how I would do with this, but it was very easy to make even for a beginner like me. Will make this one again. Tastes great, too!
So glad to hear it!
Can you Freeze the bread for a later date?
Hi Jeanne! That's a great question and yes I have successfully frozen it. You can defrost it in the fridge and you can also gently toast it in the oven to get it slightly crispy again.