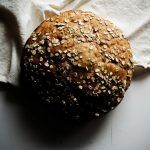
This easy no knead maple oat bread is made from spelt flour and tastes as good as it looks. This loaf is large, rustic, slightly sweet and has a crumb that is soft and spongy. This bread comes together quickly for a fresh loaf in a little as 4 hours and there is no kneading involved. This is a large 14" rustic loaf with a soft crumb and golden crust. Whole wheat flour can be used in equal measure to replace whole spelt flour; the recipe will be just as good.
Make sure to read the entire post because each step matters and there are many helpful points below.

Jump to:
My first experiences with making bread was more like adventuring in fabricating culinary doorstops—inedible, rock hard rounds of flour and water. I quickly learned the power of fresh active yeast and why it's best not to use a half opened package you find in the back of cupboard from 5 years ago. On that note, below are my notes and tips to help make my no knead maple oat bread perfectly.
Why This Recipe Works
Whole spelt flour is fairly similar to whole wheat flour in taste and texture, however, it is much more nutrient dense compared to other wheat based flours; I prefer it for that characteristic alone. Because spelt flour contains less gluten, I include bread flour in the recipe to encourage gluten formation, to make the crumb soft and to give it a pretty rise. A beautiful golden crust is topped with rolled oats (added before baking) which gives it a nice rustic texture and added flavour.
This maple oat bread loaf is subtly sweet with the addition of maple syrup, but not sweet enough that it can't be used for savory toppings. It's great for breakfast, sandwiches, toast or whatever you fancy using it for.
The final loaf is large, rustic, slightly sweet and has a crumb that is soft and spongy; it's one of my favourite loaves to make and eat. Best of all, it comes together in 4 hours—pre-warming the bowl allows the yeast to proof faster. As a result, there's no overnight proofing time required.

Ingredient Notes & Substitutions
The full ingredient list can be found in the recipe card, however, here is an outline of the main ingredients and substitutions for my no knead maple oat bread.
Warm filtered water: you will want the water to be approx 100-110℉ in order to activate the yeast and get the first rise going. It's important to use filtered water because the general consensus is that chlorinated tap water can deactivate yeast.
Active dry yeast: yeast is a key component to any bread recipe. Active dry yeast is easy to obtain and helps create a nice rise, structure and flavour to this loaf.
Kosher salt: salt is necessary to both add flavour and strengthen the gluten matrix in the dough. This helps achieve a nice rise and lift to the bread. You can also use sea salt if you don;t have kosher salt.
Maple Syrup: if you would rather not use maple syrup for this recipe, you can use liquid honey in equal measure.
Whole spelt flour: spelt flour contains less gluten than regular wheat flour, which means it has a slightly different crumb texture than wheat flour breads. However, I prefer the crumb texture and digestibility of spelt flour bread which is why I choose to use it. However, if you would rather stick with whole wheat flour, the measurement would be the same as it is for spelt.
Unbleached all-purpose bread flour: because spelt flour contains less gluten than regular wheat flour, all purpose bread flour (13% gluten content) will help achieve a good structure to the final loaf.
Rolled oats: these add flavour, texture and hearty feel to this rustic loaf. You could also use rye flakes in equal measure instead of oats.

Step by Step Overview
STEP 1: Heat a large heat proof bowl until it is warm, but not hot to the touch.
STEP 2: To the warmed bowl, add the water, yeast, and maple syrup. Give it a quick stir to combine.
STEP 3: Add in the spelt flour (or whole wheat), bread flour and salt and combine until all the flour is incorporated.
STEP 4: Cover the bowl with a lid or clean kitchen towel and place it in a warm area to proof.
STEP 5: Once the dough has finished proofing, punch down the dough by pressing the air out.
STEP 6: Form the dough into a smooth ball in the bowl and sprinkle the oats on top turning the dough to coat all sides.
STEP 7: Scrape the dough ball out onto a large piece of parchment paper and place the dough and parchment paper into a dutch oven with a lid. Cover and let proof again or until doubled in size.
STEP 8: Once the dough is proofed, place the dutch oven containing the dough into the preheated oven and bake for 40 minutes with the lid on. Carefully remove the lid and bake for another 10 minutes to brown the crust.
STEP 9: Carefully remove from the oven and then carefully lift the fully baked loaf out using the sides of the parchment paper.
STEP 10: Remove the parchment paper. Cool completely on a wire rack before slicing.
Helpful Tips
Aside from having time and patience, you need to keep in mind the following key points when shopping for ingredients making the best no knead maple oat bread
Fresh yeast is key: Active dry yeasts have a usual shelf life of about 6 months once opened. If in doubt, purchase new yeast for this recipe.
Use a kitchen scale: weighing the ingredients is far more accurate than using cups alone. Moreover, because flour density varies by brand and measuring techniques vary by regions, I highly suggest using a kitchen scale to measure the ingredients by weight. The gram measurements can be found in the recipe card below. In Canada, the gram measurement for 1 cup of flour is approx 150g.
Fresh flour is key: overtime, whole grain flours will become rancid and this taste will translate into the final recipe (it's not good, trust me). Find the freshest flour possible for this recipe—check the expiration and packaged dates on the bag.
Important Tips for Baking in a Dutch Oven
A dutch oven is my preferred vessel for baking most breads, including this one. However, not all dutch ovens are made the same. It's important to make sure that all parts of it (including the lid knob) are oven safe up to 500°F. If you don't have a dutch oven, you can make bread in loaf pans and I share some directions for how to do that next.

Can I make this into smaller loaves?
If you don't have a dutch oven, you can use two 9x5" loaf pans. You'll want to line them with parchment paper and grease them well to ensure the bread releases from the pan. You'll need to divide the dough into half after the first proofing. Then, roll each half in oats, form them into a rough oval shape and place them in the pans to proof, covered with a clean kitchen towel.
Bake at the same temperature uncovered, although you may need to watch them closely to ensure they don't over brown or burn. If need be, place a piece of aluminum foil over the top to prevent burning.
Storage
Storage: The loaf will last 2-3 days stored in an airtight container or bread bag.
Freezing: wrap the baked and cooled loaf (whole or sliced) in freezer safe paper and place it in an airtight freezer safe bag before placing in the freezer. It will last for up to 2-3 months this way. To thaw, defrost in the fridge (this usually take 12-24 hours). Depending on the size of your toaster, slices can usually be toasted right from the frozen state.
To reheat: place a piece of aluminum foil over the top of the defrosted loaf to prevent over-browning the toppings and place in a preheated oven at 300°F for 10-15 minutes.


More Recipes
I hope this recipe turns you into your own 'breadventurer' [bread-adventurer]. Once you know the basics, you can alter ingredients and flavours to make something you can be proud of—proof (pun intended) that making bread is really not complicated at all. If you love my maple oat spelt bread, check out some of my popular recipes below.
And don't forget about the butter—don't miss my classic recipe for European Style Dairy-Free Butter.
If you made my no knead maple oat spelt bread please leave me a comment below with a star rating; it really helps others who are interested in making the recipe. For more from The Simple Green, follow me on Instagram, Facebook or Pinterest. Consider becoming a subscriber to receive emails of new recipes and posts.
No Knead Maple Oat Spelt Bread
Special Equipment
- 1 5 QT Dutch Oven with a lid (see notes above re: dutch ovens)
- parchment paper
Ingredients
- 2 cups (16 oz) warm filtered water, approx 110℉
- 1-¼ teaspoon active dry yeast
- 1-½ teaspoon kosher salt, or sea salt
- 3 tablespoon maple syrup
- 300 grams (2 cups) whole spelt flour, or whole wheat flour
- 300 grams (2 cups) unbleached all-purpose bread flour
- 50-75 grams (½-¾) cup rolled oats
Instructions
- Warm a large heat proof bowl by placing it in the oven and turning the temperature to 200℉. Leave it in the oven for a few minutes until it is warm, but not hot to the touch. Alternatively, you can use a microwave safe bowl and place it in the microwave for approx. 1 minute. This step makes for a faster proofing time.
- To the warmed bowl, add the water, yeast, and maple syrup. Give it a quick stir to combine. Gently add in the spelt flour (or whole wheat), bread flour and salt and combine until all the flour is incorporated. Scrape down the sides of the bowl to ensure all the flour has been incorporated into the dough. You should now have a rough looking ball that is ready to proof.
- Cover the bowl with a lid or lint free towel and place it in a warm area to proof for 1-½ to 2 hours or until the dough is doubled in size.
- Once the dough has finished it's first proof, remove the lid and punch down the dough by pressing the air out with your hands or a spoon. Form the dough into a smooth ball in the bowl and sprinkle the oats on top turning the dough to coat all sides.
- Scrape the dough ball out onto a large piece of parchment paper (large enough to cover the bottom and up the sides of the dutch oven) and place the dough and parchment paper into a 5 quart dutch oven with a lid. Cover and let proof for 30-45 minutes or until doubled in size again.
- Meanwhile, preheat the oven to 400℉. Once the dough is proofed, place the covered dutch oven containing the dough into the preheated oven and bake for 40 minutes with the lid on. Carefully remove the lid (watch out for steam) and bake for another 10 minutes to brown the crust.
- Once baked, carefully remove the dutch oven from the oven and then carefully lift the fully baked loaf out using the sides of the parchment paper (watch out because it's hot). Alternatively, you can leave the loaf to cool in the dutch oven if you cant safely take it out. Remove the parchment paper. Cool completely on a wire rack before slicing.
Heidi's Notes
Nutrition
This is an approximation of the nutrition offered in this recipe, and is created using a nutrition calculator. I am not a nutritionist and cannot guarantee accuracy. If your health depends on nutrition information, please calculate again with your preferred calculator.
Disclaimer
all recipes on The Simple Green are developed and tested in a Canadian kitchen, at normal elevation, using electric appliances and ingredients available in Canada. Results may vary.
I followed your recipe exactly as listed. The bread came out very tasty. The dough was VERY loose, to the point that I basically had to POUR it into the dutch oven. Was it supposed to be that loose? Or, did I miss something? I used the 2 C. water and the 4 C. flour.
Hi Dutch! Likely the dough was over proofed. It should retain its shape fairly well with some slight spread, but it definitely shouldn’t be loose. Nevertheless, I’m super happy you like it!
Your grams and cups don’t equate. 120 grams equals one cup. That is why dough so wet. Disaster. Ong wasted so much flour oh boy. My bad for not catching it.
Hi Donna! Oh gosh, I’m sorry you had troubles with the recipe. I just double checked my measurements with two different scales and they do add up on my end (2 cups of light spelt or whole wheat are ~300g). However I wonder if perhaps there is a discrepancy in the type of flour brands? The flour I used is a Canadian brand. Either way, I will amend the recipe notes to include a note about this. Thank you!!
Hi Donna! So just to clarify, I spoke to another professional baker and indeed 2 cups of flour is 300g (1 cup yields 150g). I hope this helps for next time 🙂
Hi Claire! I am so happy you like the recipe. Yes, there does seem to be discrepancies when it comes to online references for cups to grams; I have updated the recipe to list the gram measurements first 🙂
This is delicious bread. It turned out so well. Thank you for the recipe.
Hi I am making this bread now, but I wanted to point out that you do not indicate when to add in the rolled oats in the instructions ?
Oh wait, you have the oats only being sprinkled on top. Oh. my bad. But I added them into the dough That's really what I wanted. not just sprinkled on top...Oh well. let's see how this turns out. I may revise your recipe to 1 1/2 cups white flour and add the 1/2 of oats into the dough and sprinkle some on top for decoration.
No worries, Diana! Let me know how it works for you with the oats in the crumb 🙂