Make delicious garlic focaccia bread at home in less than 4 hours. This easy garlic onion and herb focaccia is everything you want from this traditional Italian flatbread— it's light, crispy on the outside, and coated in a generous blend of fresh herbs, garlic, spring onions and coarse sea salt. This recipe comes together in less than 4 hours and is a perfect sharing bread for your next gathering.
This post was made in partnership with Paderno, however all thoughts and opinions are my own.

Jump to:
An Easy Focaccia Base
If you've never made focaccia before, this recipe is a perfect base recipe to get started with. Like my No Knead Garlic fougasse, focaccia is a versatile flatbread that can be made and topped to your taste. The base of any focaccia bread is the same—flour, water, yeast, and salt. But what makes focaccia so great are the flavours you mix into the dough and the toppings you add.
For this recipe, seasonal herbs—fresh parsley, basil and garlic and used together to create a superbly aromatic and flavouful focaccia. But feel free to adjust the toppings as desired; there are additional topping ideas in the recipe FAQs below.
This recipe was adapted from Martha Stewart's onion and leek focaccia however this version has been created to yield a good sized 10x15" bread. Of course, if you're having a large gathering, you can double the recipe and make two or one large bread with a 13x18" pan.

Ingredient Notes & Substitutions
The full ingredient list and amounts of each can be found in the recipe card, however, here is an overview of the main ingredients and substitutions.
Active dry yeast: yeast in general is a key component to any bread recipe. Active dry yeast is easy to obtain and helps create a nice rise, structure and flavour to this focaccia. You can substitute an equal amount of instant yeast. If you wish to substitute instant yeast, you will not need to proof it in the warm water; instead add it to the flour mixture and then proceed with the recipe.
Warm filtered water (100-110°F): this is essential to activating the yeast. I suggest having a thermometer on hand. Chlorinated tap water can cause the yeast to retard or deactivate, so the consensus is to use filtered water whenever possible.
Granulated sugar: this help encourage yeast activity during the initial proof.
Extra virgin olive oil: this is used for the herb topping as well as in the dough and on the pan. Olive oil i a traditional ingredient giving focaccia that super soft interior and classic golden exterior. Brushing olive oil on top also adds a beautiful sheen and flavour. I do not suggest using another type of oil.
Unbleached all purpose flour: like all bread, this forms the base of the dough. You can also use bread flour in equal measure; this will create a more chewy crumb because of the higher gluten content.
Sea salt: essential to creating a flavourful bread dough and a strong gluten matrix.
Fresh Italian parsley: Italian parsley, sometimes called flat leaf parsley, is a traditional topping for may focaccia bread recipes. I like it over curly parsley because it's flavour is more robust.
Fresh basil leaves: this is another classic focaccia topping.
Garlic clove: this is added to the top of the dough along with the fresh herbs. Fresh garlic added to the dough can retard yeast activity or even deactivate it altogether, so I prefer using it on top to prevent this possibility.
Spring onions: these add additional flavour and aesthetics to the baked focaccia.
Coarse or flaky sea salt: this makes an idea topping for the bread adding both flavour and texture.

How to make Garlic Onion Focaccia Bread
The full method list can be found in the recipe card; here is a brief outline of the steps for this recipe.
Prepare the dough
Step 1: In a large bowl combine the yeast, water and sugar. Allow to stand for about 5 minutes or until it starts to foam. This is how you know the yeast is active and will create rise to the bread.
Step 2: Add the flour, salt and olive oil to the yeast mixture. Using an electric mixer fitted with a dough hook, mix the dough on low speed until all the flour is incorporated. Continue mixing and kneading for 1 minute total or until the dough is smooth and elastic.
Step 3: With lightly floured hands, shape the dough into a ball and place back into the mixing bowl. Cover and let rise in a warm place for about 2 hours or until doubled in size.

Shape the Dough
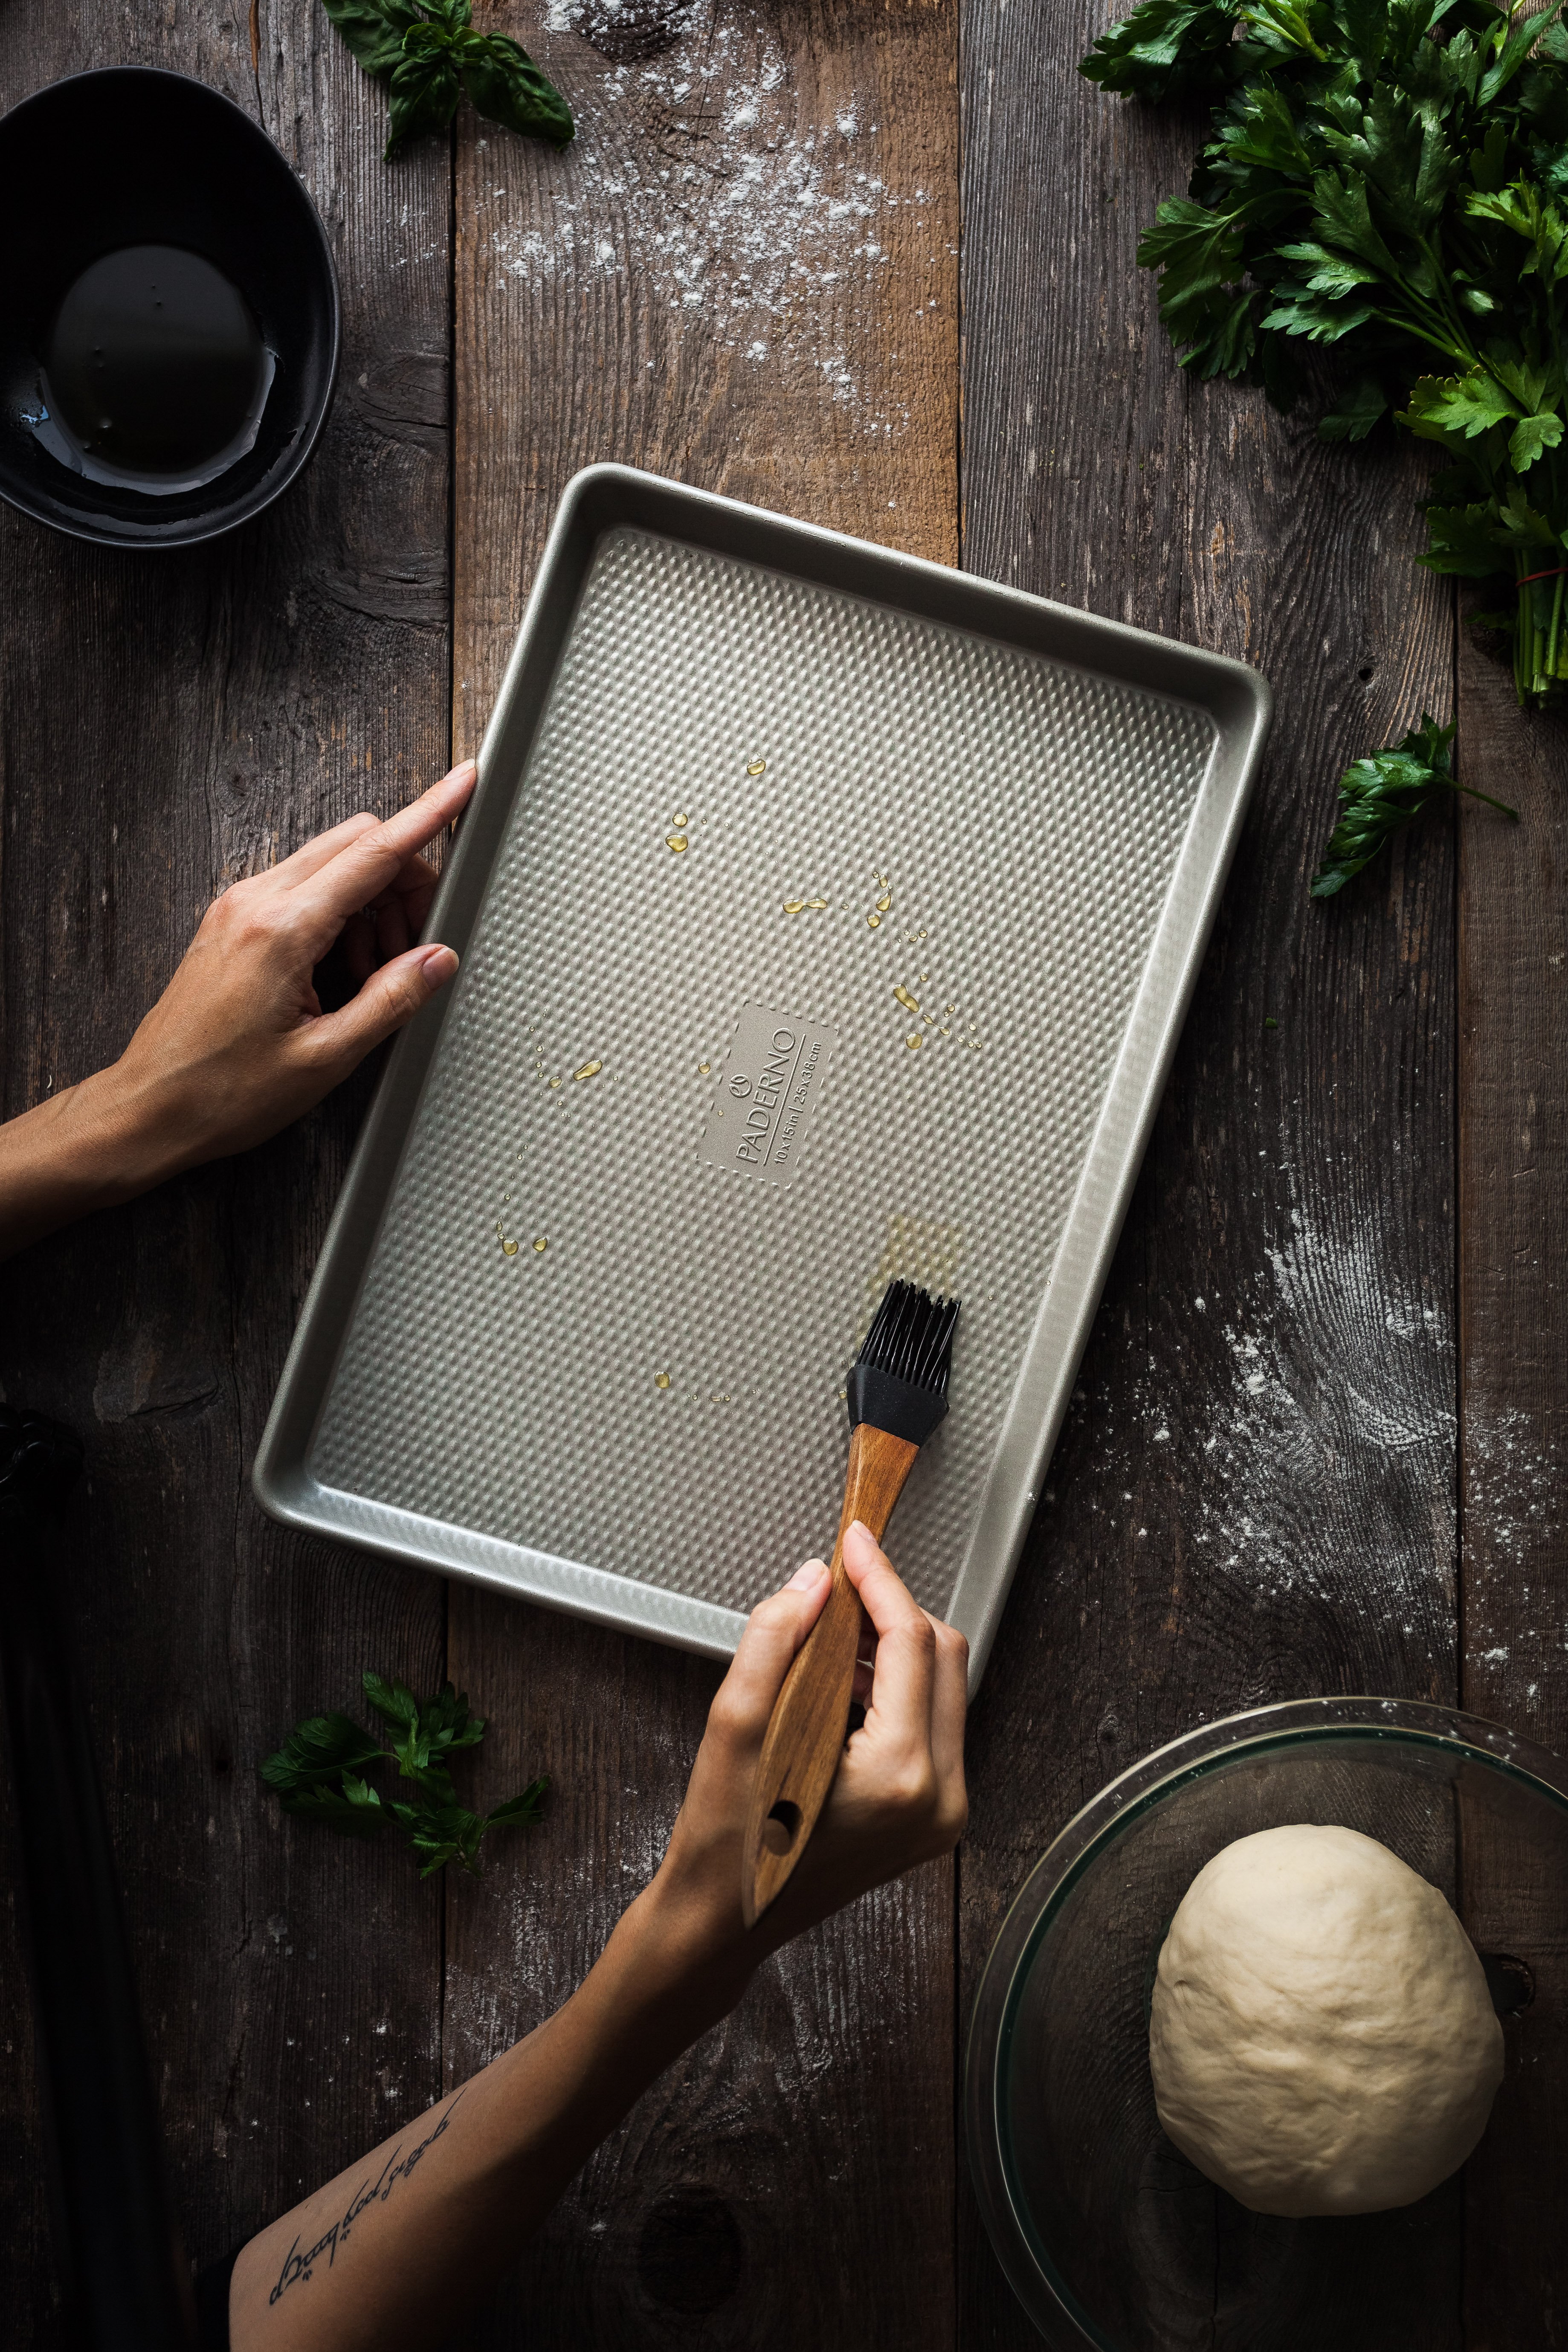
Step 4: Generously oil a 10x15" baking sheet. Once the dough has doubled in volume, punch it down and scrape it out of the bowl onto the prepared baking sheet.
Step 5: Allow the dough to rest on the baking sheet for 10 minutes to allow the gluten strands to relax. Then, using your hands, gently press the dough into a rectangular shape towards the edges of the baking pan. Cover the dough and place in the fridge for 1 hour.
Prepare the Toppings and Bake
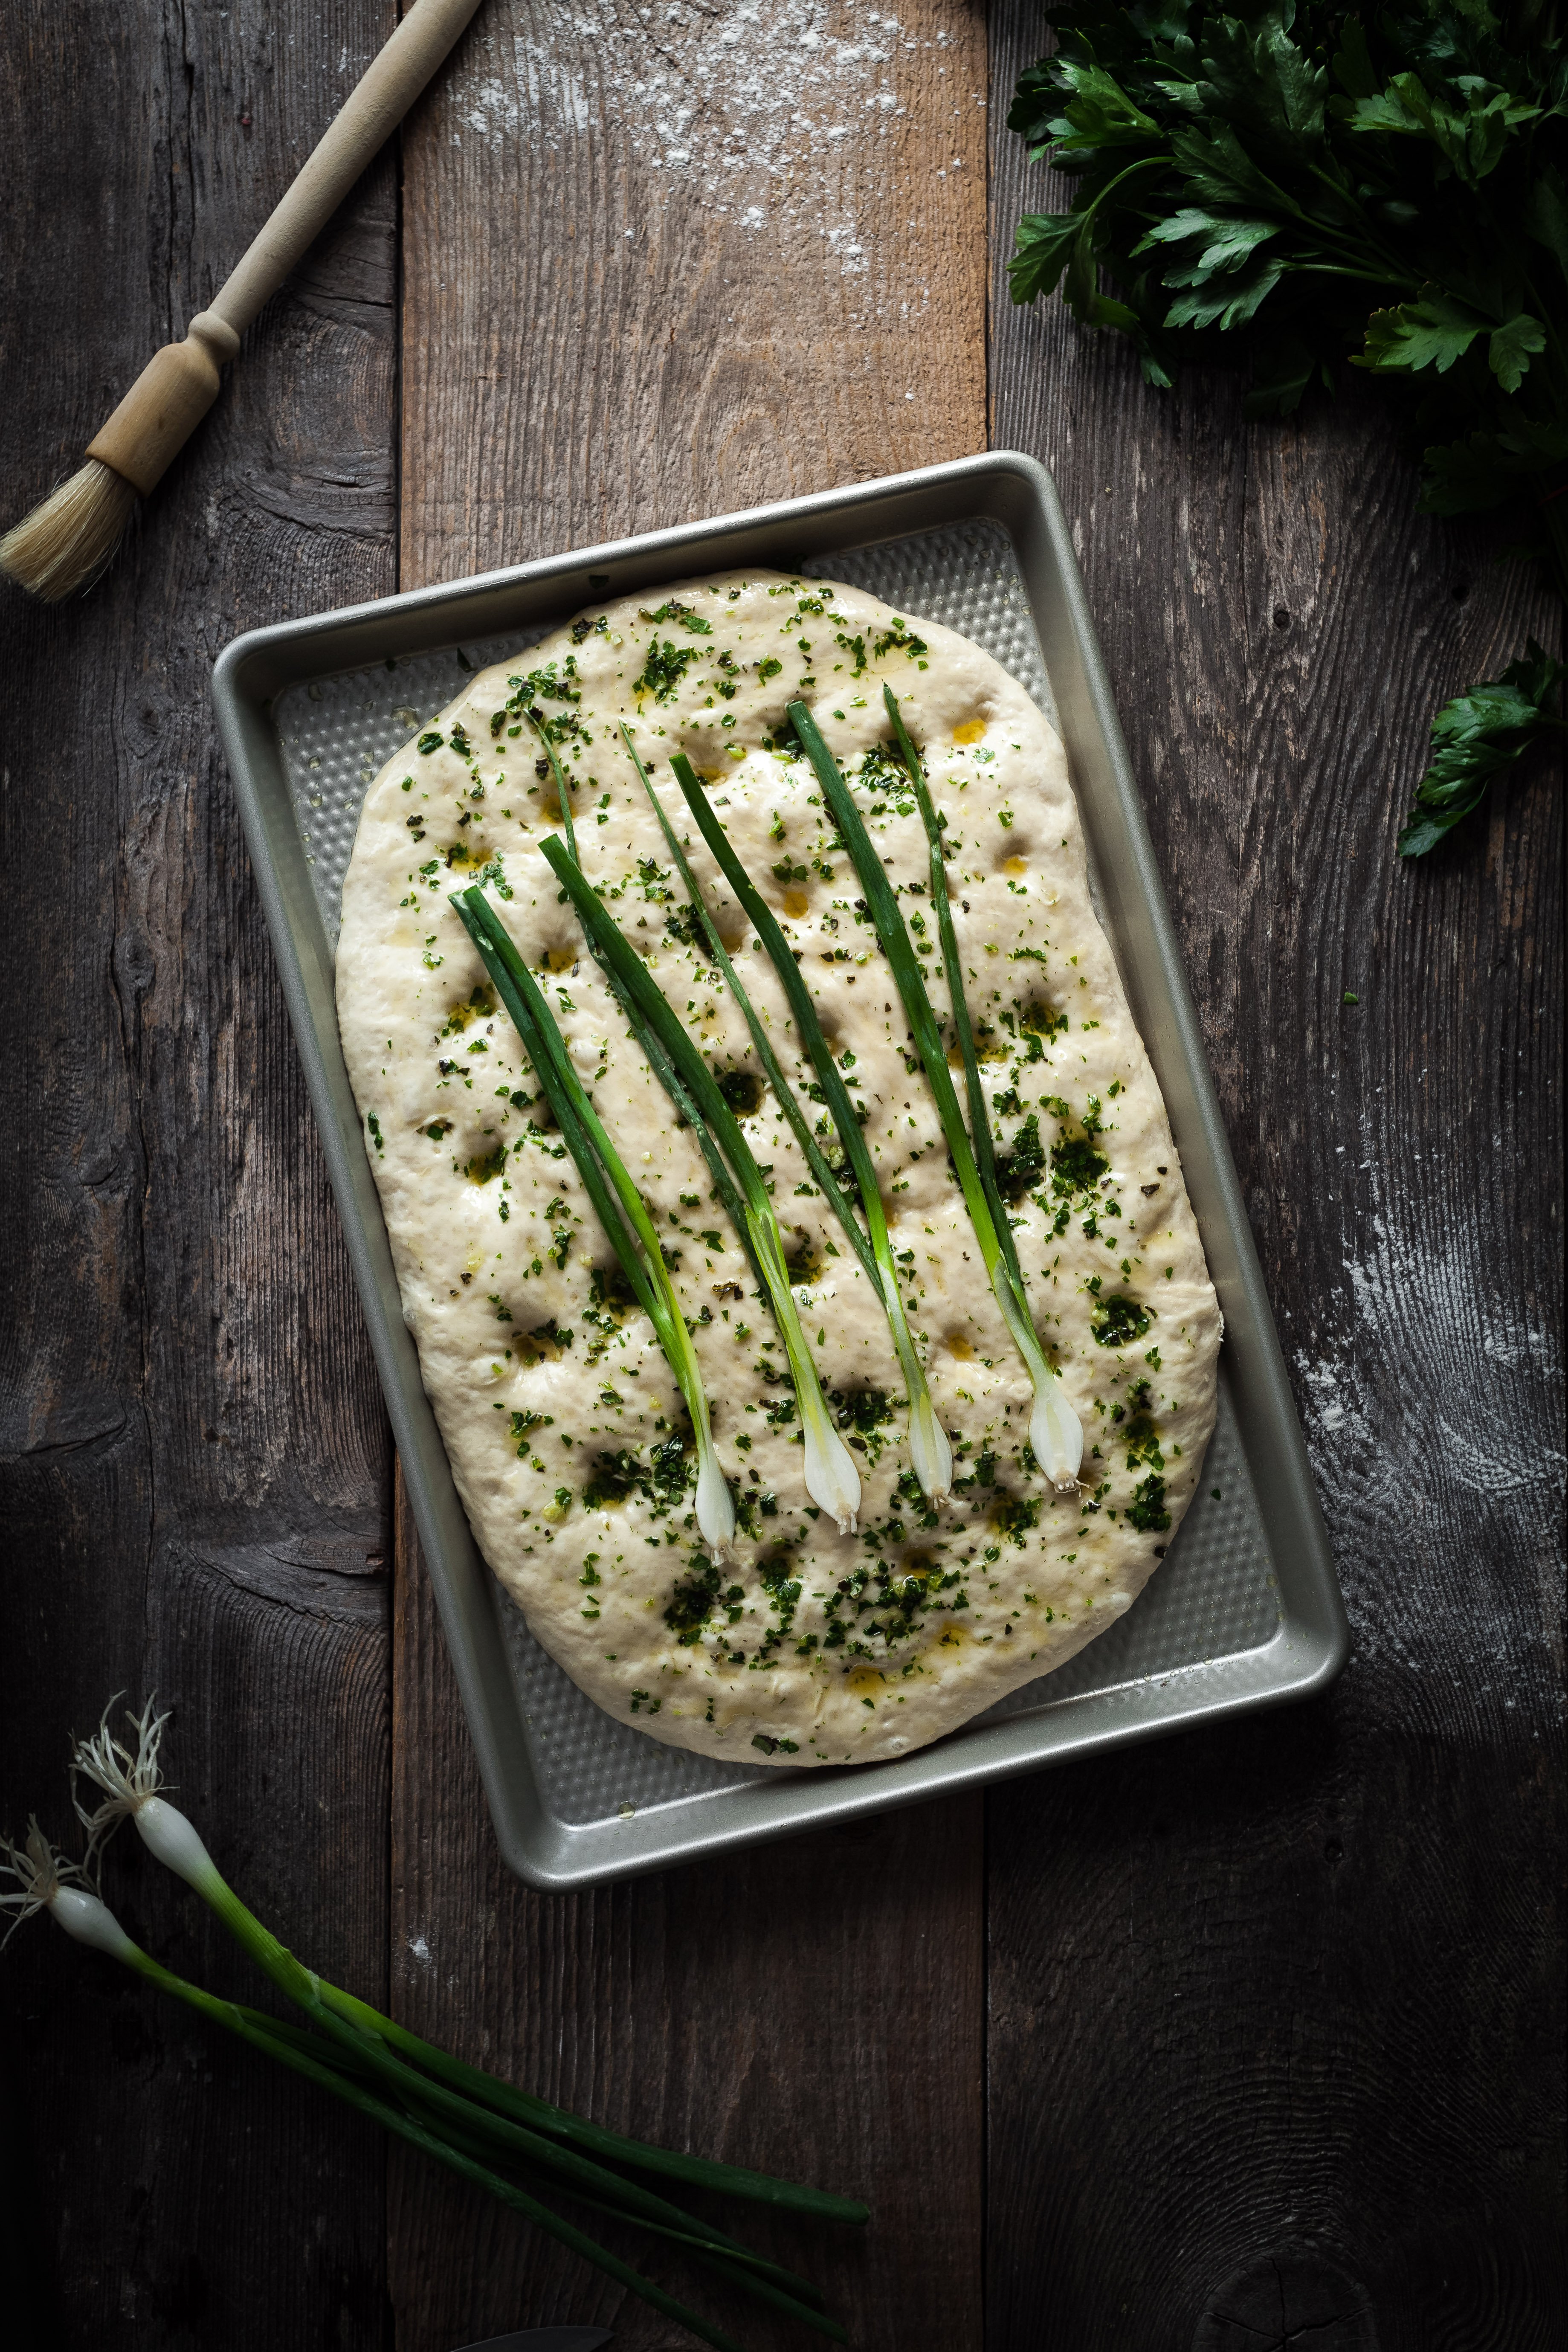
Step 6: Finely chop the herbs and garlic and place into a small bowl ad mix with the olive oil. Slice each spring onion in half lengthwise.
Step 7: Preheat the oven to 450°F. Remove the dough from the fridge and remove the cover. Using two fingers, create dimples in the surface of the dough.

Step 8: Generously apply the olive oil and herb mixture with a pastry brush onto the top of the dough. Arrange the spring onions on top and gently press them into the dough. Sprinkle with coarse salt.

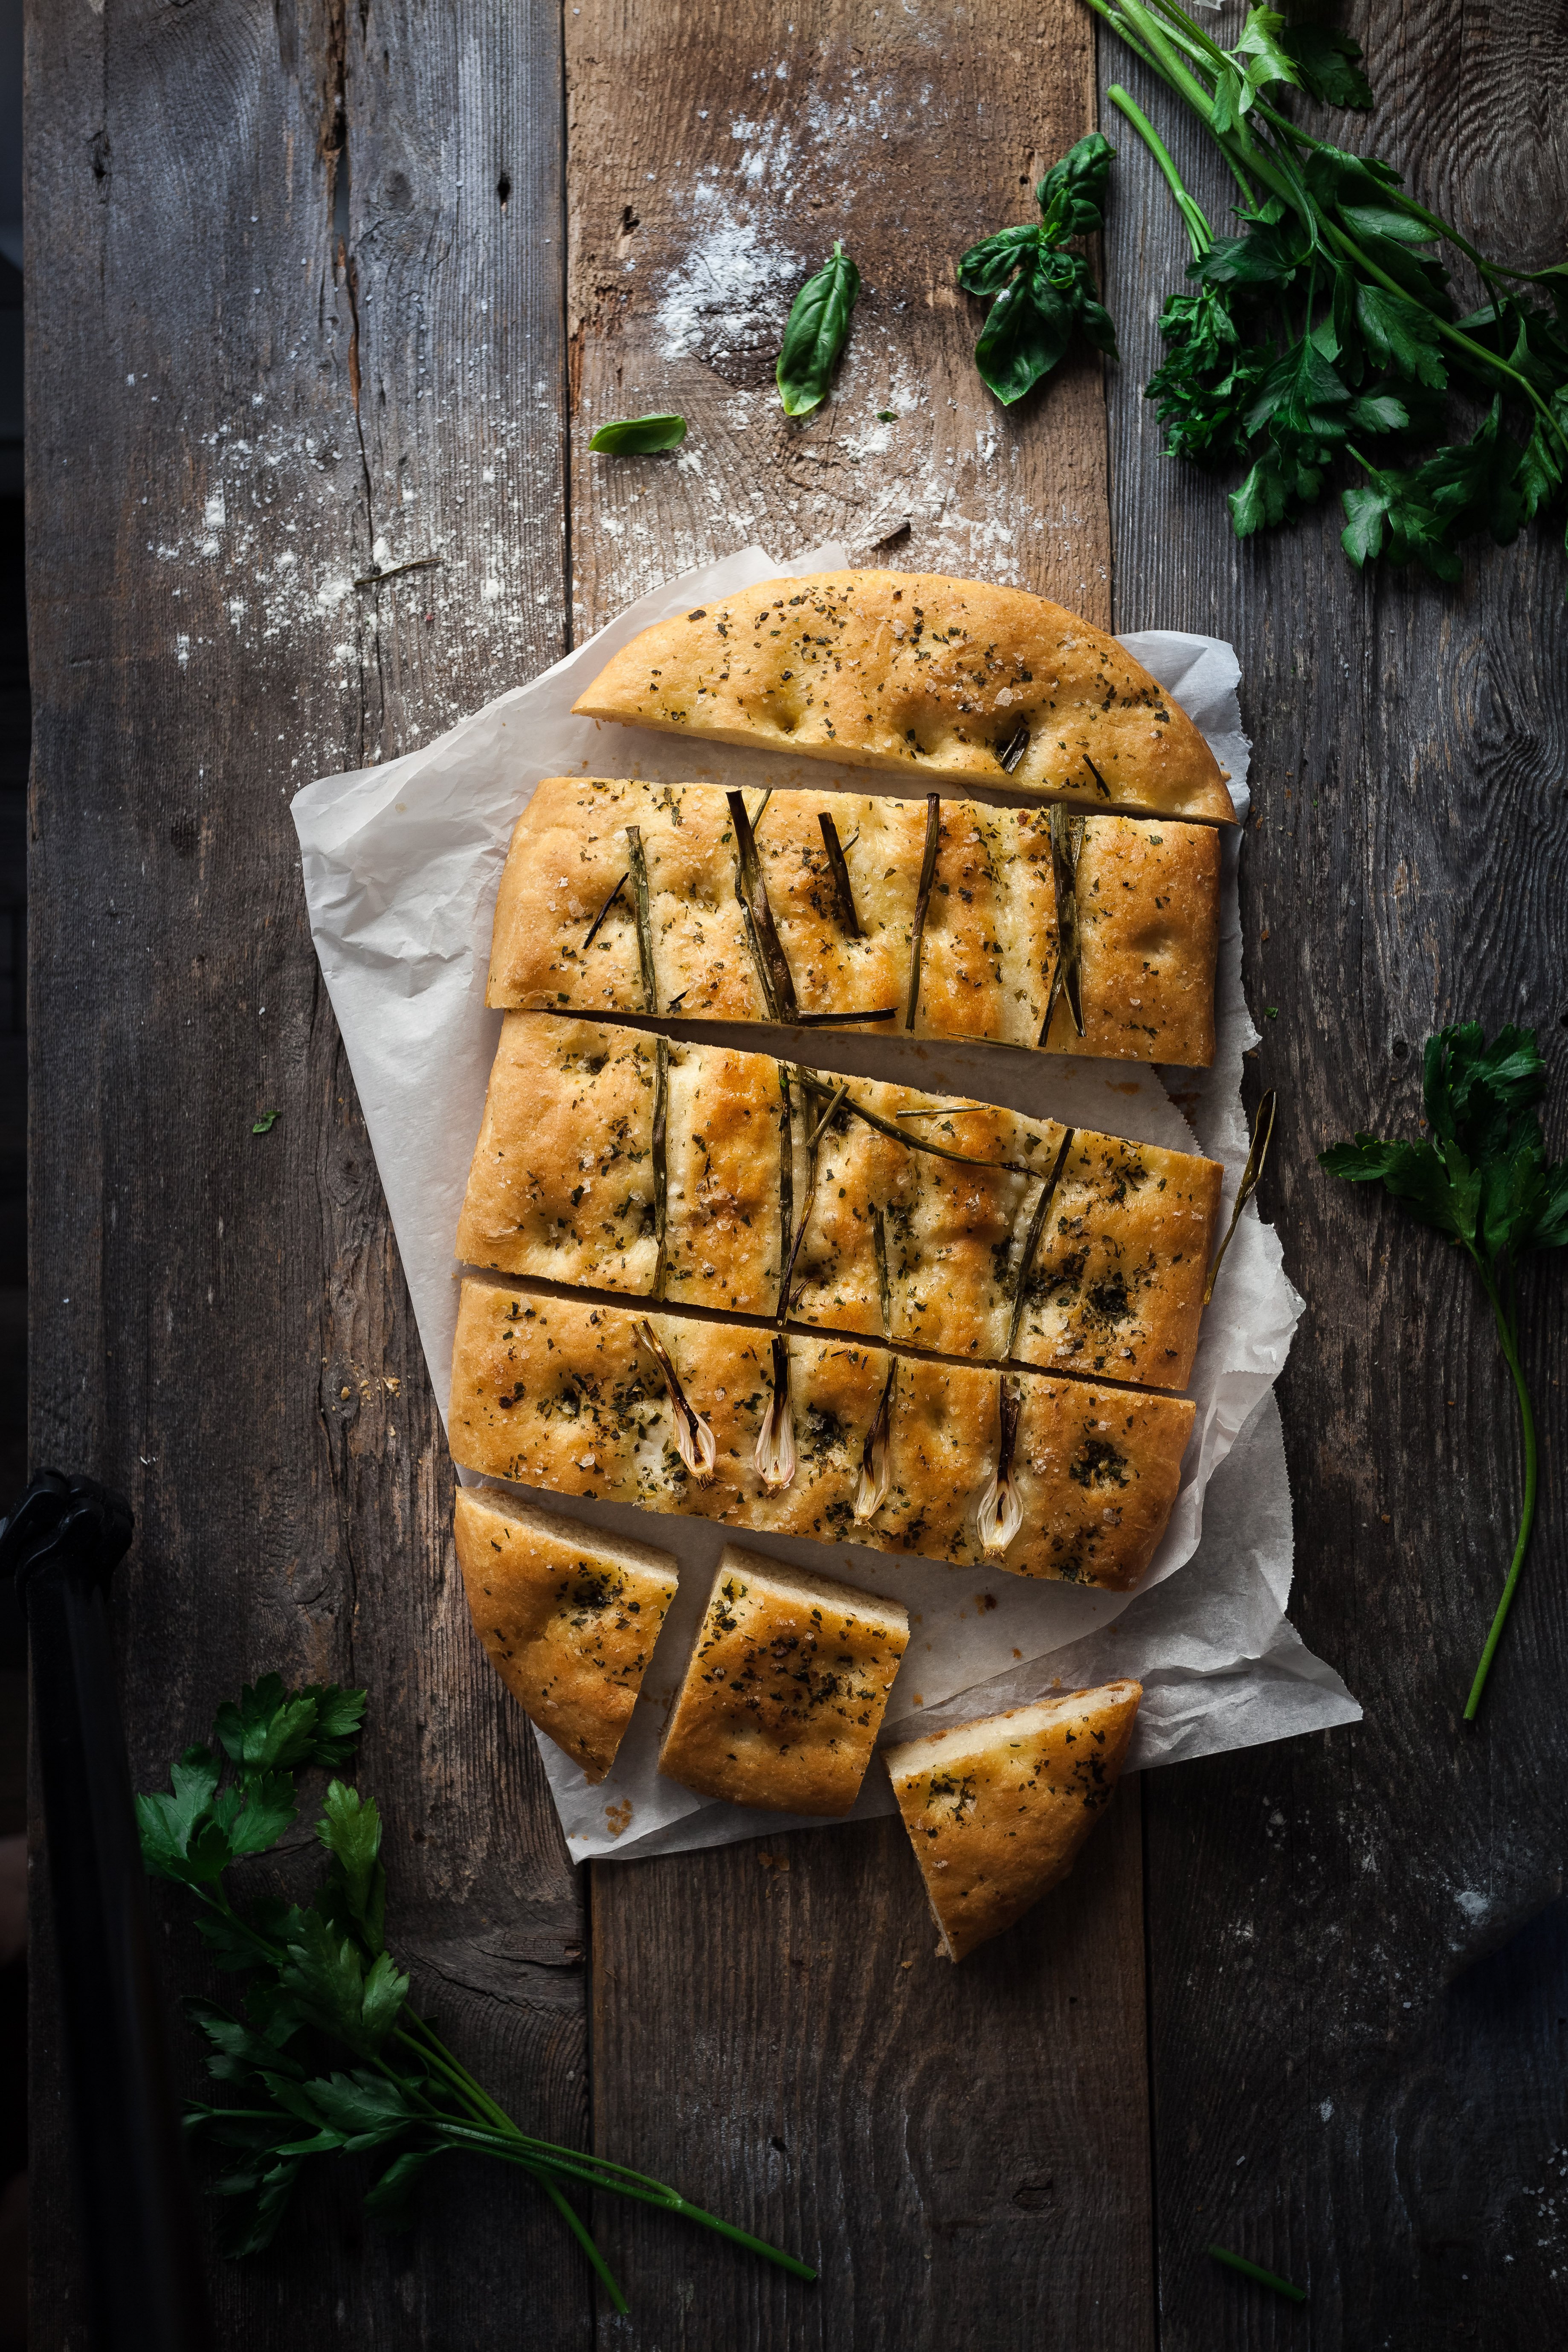
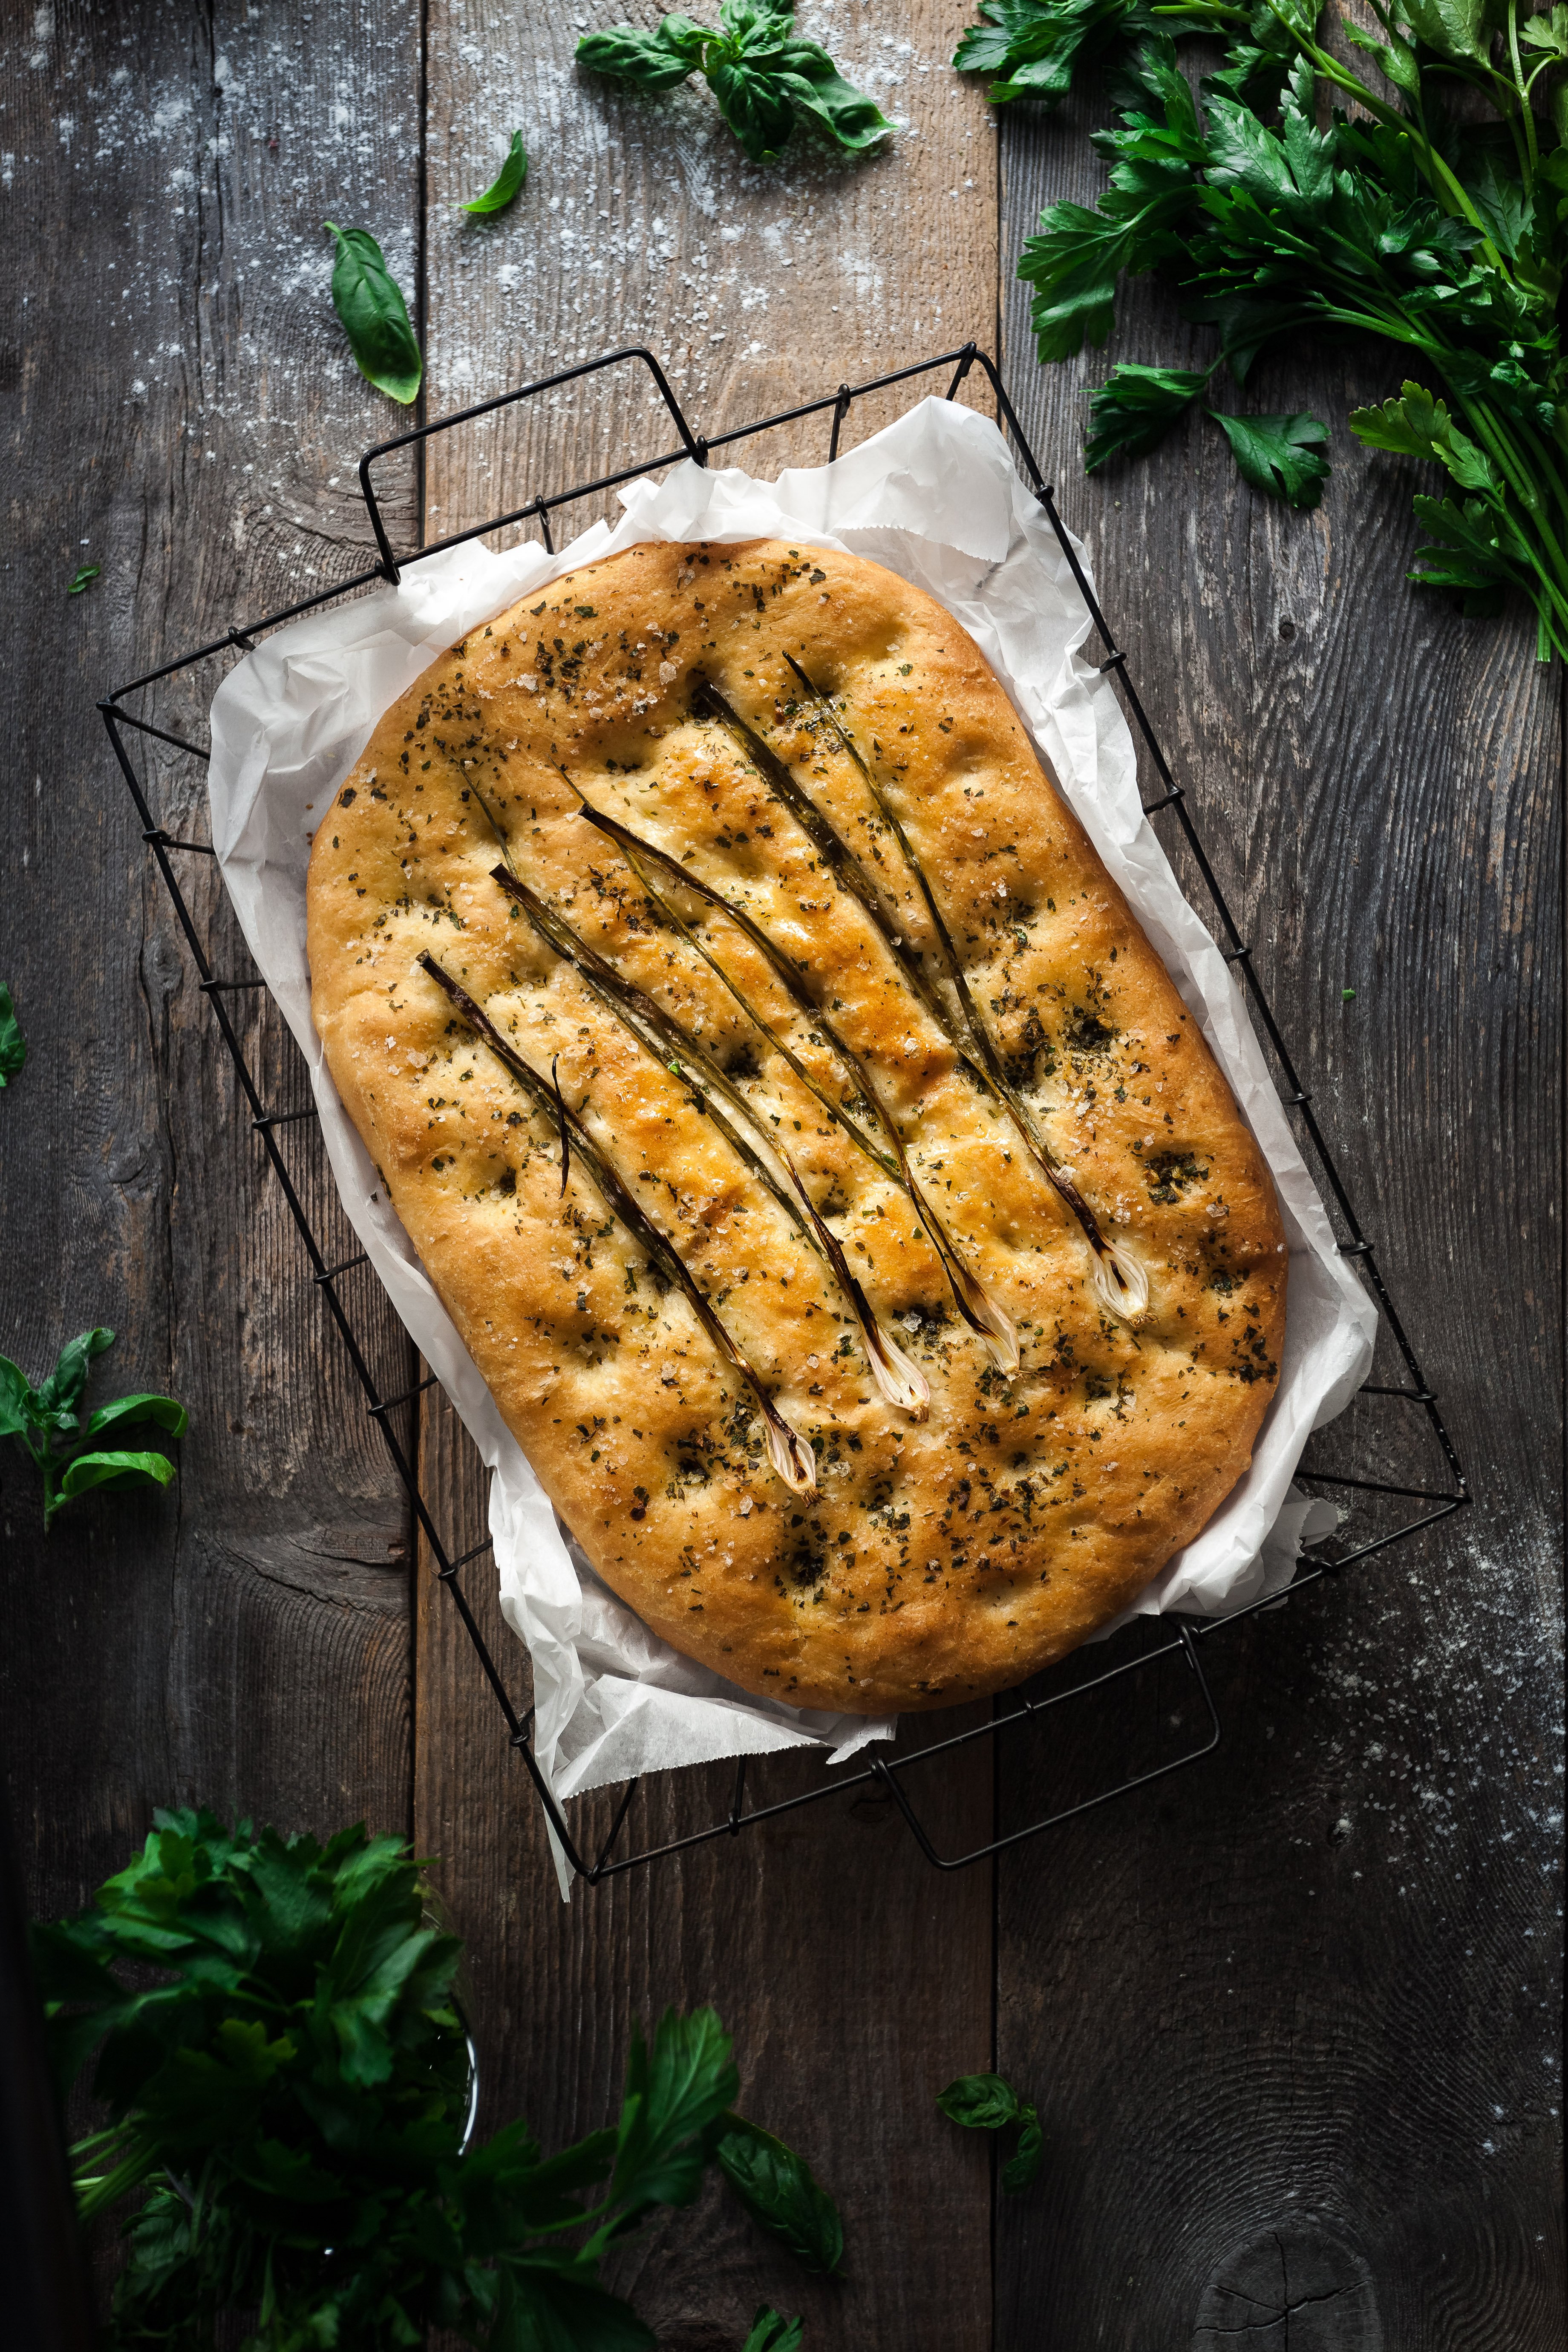
Step 9: Bake the prepared focaccia in the preheated oven for 20-22 minutes, or until golden brown. Remove from the oven and let cool. Finish the bread with a light brushing of olive oil. Slice and enjoy.
My Sponsor for this Recipe
I'm partnering with Paderno to share the recipe for this beautiful garlic herb and spring onion focaccia. This recipe is simple to make, but add to it the efficiency of the new Paderno small appliance line, and it comes together that much faster. I love working with these appliances - they're versatile, beautiful and practical for everyday use at home.
For this recipe, the Paderno 3-cup food chopper swiftly chops fresh herbs - simply add them to the container, process on speed 1 and within seconds, everything is perfectly prepared. This appliance is lightweight and easy to use; I find myself using it regularly at home to chop garlic and onions (two things I don't like doing).
Moreover, if you're not a fan of kneading dough by hand, the Paderno 10 speed hand mixer fitted with the dough hooks makes mixing and kneading dough much easier, especially if you don't have a stand mixer.
Helpful Tips
- Make sure the yeast is fresh: Active dry or instant yeasts have a usual shelf life of about 6 months once opened. If in doubt, purchase new yeast.
- Generously oil the baking pan and surface of the bread: this is the key to creating a perfectly golden and crispy crust.
- Use the freshest herbs available: again, you can mix and match any herbs you like for this recipe).
- Use a kitchen scale: weighing the dough ingredients is far more accurate than using cups and spoons alone. The recipe card includes the weight measurements to help make sure you don't over or under measuring the ingredients.
- Fresh garlic added directly to the dough can deactivate yeast. This will result in bread that doesn't rise. For that fresh garlicky flavour, baste it on top with some olive oil or incorporate chopped garlic into your dough after the first proof (note that this doesn't always work though).
Storage & Make Ahead Notes
Make Ahead: You can prepare and shape the foccacia dough up to 24 hours before you plan to bake it. Once you have proofed and shaped the dough on the baking sheet, cover and leave it in the fridge for up to 24 hours, then proceed with the final steps as above.
Storage: the baked focaccia is best served warm the same day. However, leftovers should be stored in an airtight container for up to 2 days.
Freezing: the baked focaccia can be frozen whole or in portions. Wrap the loaf or portions well in plastic wrap and then place in a freezer safe bag; it should keep for up to 1-2 months this way. To thaw, defrost the focaccia in the fridge (this usually take 12-24 hours). To reheat, place a piece of aluminum foil over the top of the loaf to prevent over-browning the toppings and place in a preheated oven at 375°F for 10-15 minutes.

Recipe FAQs
Focaccia is a traditional Italian flatbread similar in texture to pizza dough—it's golden and crispy on the outside with a remarkably soft and light crumb. It's perfect on its own, however, it also makes for great sandwiches, paninis, or as a side for antipasto. This bread has been beloved by Italians for centuries.
Any combination of fresh or dried herbs can work for this recipe. You can also try fresh rosemary, thyme, oregano, cherry tomatoes, sun dried tomatoes, leeks, olives, caramelized onions or sliced garlic. Focaccia is also excellent with just a sprinkling of coarse or flaky sea salt.
The two can be used interchangeably, however, instant yeast will result in a faster rise time which can result in less flavour and less gluten formation (aka structure) to the bread crumb. Active dry yeast is slower to rise and for this recipe it works best.
DID YOU MAKE THIS RECIPE? I would so appreciate you giving it a star rating below or leaving me a comment. Share it with me on Instagram using the tag @the_simple_green. For more recipes and content, be sure to follow me on Instagram, Facebook, Pinterest and YouTube.

Easy Garlic Herb & Spring Onion Focaccia
Ingredients
Focaccia Dough
- 1 teaspoon (4g) active dry yeast
- 8 oz (228g) warm filtered water (100-110°F)
- 1 teaspoon (5g) granulated sugar
- 2 tablespoon extra virgin olive oil
- 2 ¼ -2 ½ cups (340-380g) unbleached all purpose flour
- 1 teaspoon (5g) sea salt
Toppings
- ⅔ cup Italian parsley
- 3 tablespoon fresh basil leaves
- 1 clove garlic
- 3-4 spring onions, roots removed
- ⅓ cup extra virgin olive oil, plus more for the pan
- 1 teaspoon coarse or flaky sea salt
Instructions
Prepare the dough
- In a large bowl combine the yeast, water and sugar. Allow to stand for about 5 minutes or until starting to foam.
- Add the flour, salt and olive oil to the yeast mixture. Using an electric mixer fitted with a dough hook, mix the dough on low speed until all the flour is incorporated. Continue mixing and kneading for 1 minute total or until the dough is smooth and elastic. If the dough is very sticky and wet, add the remaining ¼ cup of flour. Alternatively, you can mix by hand- use a wooden spoon and stir until the dough is combined, then knead the dough by hand on a lightly floured surface for 1 minute. The surface of the dough should spring back when it's touched- this means it's ready to proof.
- With lightly floured hands, shape the dough into a ball and place back into the mixing bowl. Cover and let rise in a warm place for about 2 hours or until doubled in size. Depending on the freshness of your yeast and the ambient temperature, the dough may take less or more time to double in volume.
Shape the Dough
- Generously oil a 10x15" baking sheet. Once the dough has doubled in volume, punch it down and scrape it out of the bowl onto the prepared baking sheet. If the dough is too sticky to handle, lightly dust it with flour directly in the bowl.
- Allow the dough to rest on the baking sheet for 10 minutes to allow the gluten strands to relax (this will assist in shaping the dough). Then, using your hands, gently press the dough into a rectangular shape towards the edges of the baking pan. If the dough springs back, let it rest for another 5-10 minutes, then shape it again. Cover the dough and place in the fridge for 1 hour.
Prepare the Toppings
- Using a small food processor add the parsley, basil and garlic. Process on speed 1 until finely chopped (about 8 seconds). Alternatively chop the herbs by hand. Place the chopped herbs into a small bowl and stir in the olive oil. Slice each spring onion in half lengthwise. Set aside.
Top and Bake
- Preheat the oven to 450°F. Remove the dough from the fridge and remove the cover. Using two fingers, create dimples in the surface of the dough, spacing them about 1-1 ½" apart.
- Generously apply the olive oil and herb mixture with a pastry brush onto the top of the dough. Make sure the entire surface is well coated in olive oil (note you may not need all of the mixture). Arrange the spring onions on top and gently press them into the dough. Sprinkle with coarse salt.
- Bake the prepared focaccia in the preheated oven for 20-22 minutes, or until golden brown. Remove from the oven and let cool. Finish the bread with a light brushing of olive oil. Slice and enjoy.
Notes
Nutrition
This is an approximation of the nutrition offered in this recipe, and is created using a nutrition calculator. I am not a nutritionist and cannot guarantee accuracy. If your health depends on nutrition information, please calculate again with your preferred calculator.
Disclaimer
all recipes on The Simple Green are developed and tested in a Canadian kitchen, at normal elevation, using electric appliances and ingredients available in Canada. Results may vary.
Thank you for the feedback, Kathleen! Happy to hear it 🙂
Heidi knocks it out of the park again with this amazing recipe! I never would have imagined myself making such delicious breads! But the Simple Green's recipes make artisan breads so accessible!
I’m so happy to hear it worked for you, Aileen 🙂 And thank you for the wonderful feedback! Always making my day, girl! Xoxo
Would the bread be weighed in 109 calories for the entire loaf or 109 calories in “so and so” grams/ ounces? Would love to know, it was amazing!
Hi Samantha! Good question. The recipe makes roughly 12 servings/pieces, so it would be approximately 109cal per piece. Unfortunately, I don't have an exact weight per piece. Does this help?
Brilliant! Extremely helpful. Thank you!
Really happy with this recipe. I didn't have spring onion on hand but added chives into the herb mixture. Delicious soft focaccia with a crispy top.
I am so happy to hear it, Chels 🙂
Excellent recipe!
So happy you like it, CJ!
Love this foccacia! I made it into two smaller individual loaves and reduced the baking time a smidge for a softer crust. So good!
So glad to hear it!
Love this foccaccia reecipe it turned out really well! Thank you!
I'm so glad to hear it, Kanaka!
Gorgeous images, Heidi! I can't wait to share this recipe with my family. It turned out so well and im so happy to have found your blog via pinterest.
I'm so happy to hear it, Eva!
Lovely foccacia! Thank you for this easy recipe.
So glad you like it 🙂
Love how this turned out. Thank you =)
So happy to hear it, Dee!
For toppings, today I used roasted grape tomatoes, caramelized red onion and red/yellow/orange pepper strips I caramelized with the onion, basil and rosemary in the olive oil with garlic. Smells divine! So easy and delicious. I have made it several times before with different toppings. Thank you!
Hi Arna! I'm so happy to hear it, thank you for making my recipe!
Hi Heidi,
This is a delicious and super easy recipe. I've adapted it in many ways to create variations including a sesame seed topping. It's wonderful! Thank you 🙂
Thank you for sharing that, Charlotte! I'm really happy to hear it!
I made this and it was great! I don’t know why it won’t let me upload a picture but it was pretty too!
Thank you so much for the great feedback. I wish there was an photo sharing function here, although you can share with me via instagram @the_simple_green I'd love to see it 🙂
My Son has asked me repeatedly to bake more of this. The dough goes together simply and rises just beautifully.
It's absolutely delicious and the toppings make it extra special.
Thank you!
Nancy - Oregon
Hi Nancy! I am so pleased to hear that. Thank you for taking the time to share that with me 🙂 Have a wonderful day!