Chickpea brine (aquafaba) makes the base for these stunningly easy vegan meringue cookies. These are perfect for the holidays—light, airy, sweet and, best of all, taste just like traditional meringue cookies with a number of flavour variations available.

Jump to:
Why this recipe works
Traditional meringue cookies are made with egg whites. However, did you know that you can make the meringue out of nothing more than chickpea brine? Also known as aqua-faba ("bean water"), chickpea brine shares a similar viscosity and flavour (less) profile to that of egg whites. Once it is whipped and combined with sugar, chickpea brine will transform into a fluffy cloud for making perfect egg-less meringue.
These vegan meringue cookies are 100% reminiscent of the traditional version—people are often surprised when they learn that these fluffy little cookies were made from something we normally don't think of as edible.
If this is your first time trying aquafaba meringue, you're in for a treat. Instead of discarding the chickpea water from a can, whip it with sugar and cream of tartar to make these cookies.

Ingredient Notes & Substitutions
For the full list of ingredients and amounts, please see the recipe card.
Unsalted Canned Chickpeas: it's not the chickpeas you need, rather the chickpea brine (aquafaba).
Powdered sugar: sometimes referred to as confectioners sugar or icing sugar. This should be well sifted to make sure there are no lumps.
Cream of tartar: used to help stabilize the whipped aquafaba.
Pure vanilla extract: used to flavor the cookies, however, you can use whatever flavouring you wish.
Step by Step Instructions
For the full detailed recipe instructions on making my vegan meringue cookies, please see the recipe card.
STEP 1: Preheat the oven to 250'F. Line two baking sheets with parchment paper. Set aside.
STEP 2: Drain the canned chickpeas, reserving the brine. In a large bowl or the bowl of a stand mixer, add the chick pea brine, cream of tartar and beat on high until soft peaks form.
STEP 3: With the beater running, gently add the powdered sugar a couple tablespoons at a time until all the sugar is incorporated. Continue beating on high until glossy-stiff peaks form.
STEP 4: Add the vanilla and mix until well incorporated.
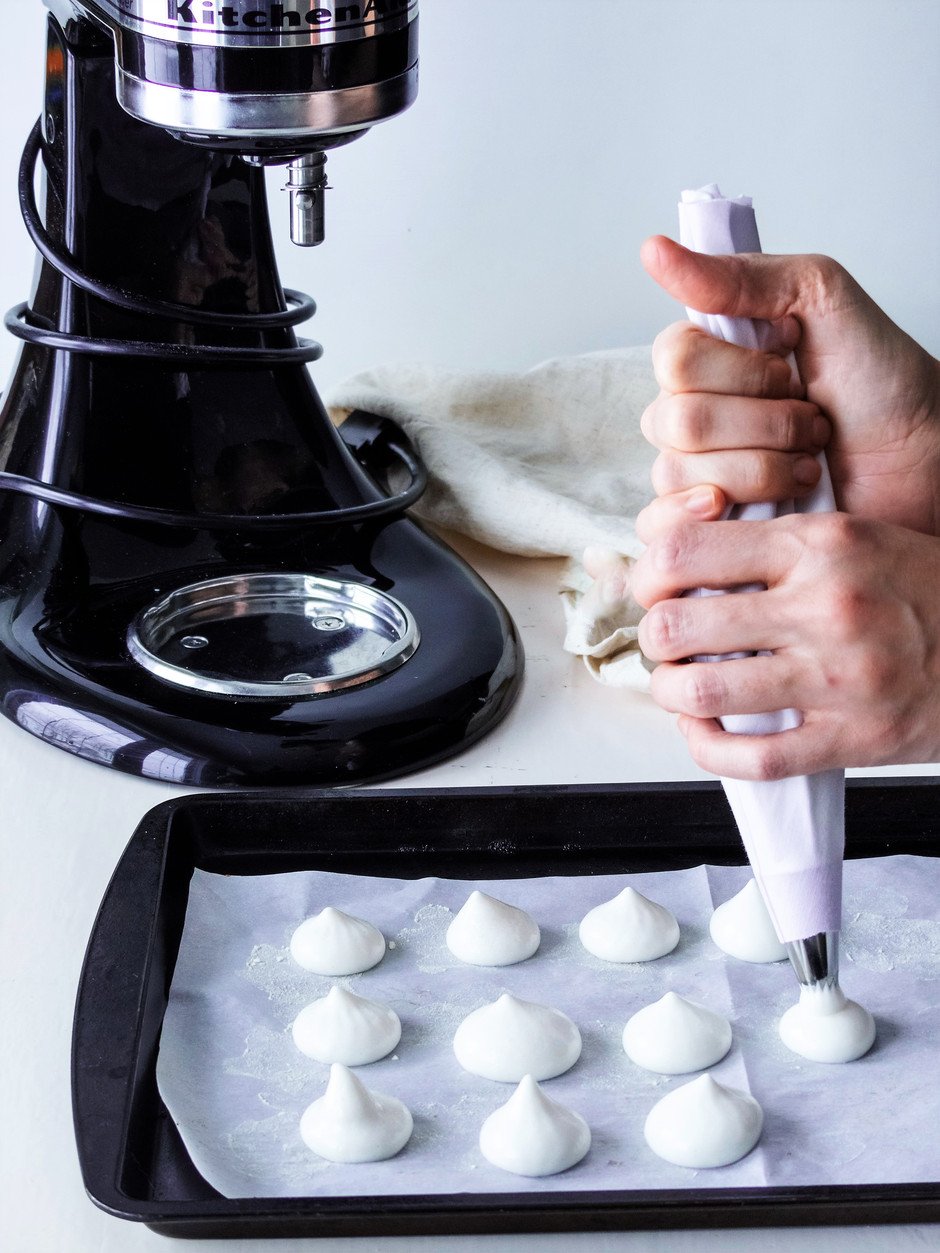
STEP 5: Transfer the mixture to a piping bag. Pipe the cookies approx 2" around on your prepared baking sheets, making sure to keep about 1" between each cookie. If you don't have piping tips, simply cut a 2cm opening onto a piping bag or the corner of a firm plastic bag.
STEP 6: Bake for 60 minutes or until the cookies are hard on the outside, but not golden or browned.
STEP 7: Once cool to the touch, gently remove from the baking tray and place on a wire rack to garnish further if desired.
Helpful Tips
- Beat until glossy peaks form- this can take anywhere from 5-10 minutes depending on the equipment used.
- Use a stand mixer- this will make quick work of beating the aquafaba to stiff glossy peaks. Alternatively, a hand mixer will work. Unfortunately, it's not really possible to make this recipe by hand beating alone.
- Beat in the sugar slowly- you don't want sugar flying all over the place. Plus, adding too much sugar at once can deflate your meringue.
- Bake them at low temperature- if you're not certain your oven temperature is correct, invest in a manual oven thermometer. You don't want these to burn or brown during the baking process.
- Let them cool on the baking tray-leave the cookies on the baking tray to cool for before removing them a wire rack. This step will help keep the meringues crisp and airy.

Flavouring Options
- Sandwich these cookies together with thick jam, peppermint frosting or ganache.
- Coat them in a chocolate drizzle.
- Dust them with vanilla sugar.
- Use peppermint extract instead of vanilla.
- Drizzle dark chocolate and dust them with finely ground pistachios.
Storage
Cool these cookies completely before storing. These can be packaged in an airtight container or sealed bag for storing or gifting. However, it's best to consume or gift these cookies on the same day they're made—like traditional meringue, these too will start to lose their crisp exterior by the second day. These will keep for up to 5 days in an airtight container at room temperature.
Serving & Gifting
These cookies make a wonderful hostess gift, one that will be sure to impress even the most discerning of palates. They also make a great amuse bouche after a meal or before dessert service.
They can be packaged nicely into an airtight container or sealed bag. However, again, it's best to consume or gift these cookies on the same day they're made.

More holiday recipes
Chocolate Dipped Olive Oil Biscotti
Chewy Vegan Ginger Spice Cookies
If you made my Vegan Meringue Cookies please leave me a comment below with a star rating; it really helps others who are interested in making the recipe. For more from The Simple Green, follow me on Instagram, Facebook or Pinterest. Consider becoming a subscriber to receive emails of new recipes and posts.
Easy Vegan Meringue Cookies
Special Equipment
- Electric Stand Mixer or Hand mixer with whisk attachment
- Measuring cups
- Measuring spoons
- Piping bag and tip
- Flexible spatula
- parchment paper
- 2 Large Baking pans
Ingredients
- 1 398 ml can of chickpeas, unsalted
- 1 ¼ cups powdered sugar
- ½ teaspoon cream of tartar
- 1 teaspoon pure vanilla extract
Instructions
- Preheat the oven to 250℉. Line two large baking sheets with parchment paper. Set aside.
- Drain the canned chickpeas, reserving the brine (aquafaba). In a large bowl or the bowl of a stand mixer fitted with a balloon whisk), add the chick pea brine (aquafaba), cream of tartar and beat on high until soft peaks form. A stand mixer will make this process faster, however a handheld electric mixer will work just fine.
- With the beater running, gently add the powdered sugar a couple tablespoons at a time until all the sugar is incorporated. Continue beating on high until glossy-stiff peaks form. Add the vanilla and mix until well incorporated.
- Transfer the mixture to a piping bag fitted with either an open star attachment or a round tip. Pipe cookies approx 2" around on your prepared baking sheets, making sure to keep about 1" between each kiss. If you don't have piping tips, simply cut a 2cm opening onto a piping bag or the corner of a firm plastic bag.
- Bake at 250°F for 60 minutes or until the cookies are hard on the outside, but not golden or browned. Note that they may retain a small amount of tackiness when you remove them from the oven; allowing them to cool for about 5 minutes will firm them up completely.
- Once cool to the touch, gently remove from the baking tray and place on a wire rack to garnish further if desired. Store the cookies in an airtight container for up to 5 days.
Heidi's Notes
- Sandwich these cookies together with thick jam, peppermint frosting or ganache.
- Coat them in a chocolate drizzle.
- Dust them with vanilla sugar right out of the oven when they're still tacky.
- Use peppermint extract instead of vanilla.
- Drizzle dark chocolate and dust them with finely ground pistachios.
Nutrition
This is an approximation of the nutrition offered in this recipe, and is created using a nutrition calculator. I am not a nutritionist and cannot guarantee accuracy. If your health depends on nutrition information, please calculate again with your preferred calculator.
Disclaimer
all recipes on The Simple Green are developed and tested in a Canadian kitchen, at normal elevation, using electric appliances and ingredients available in Canada. Results may vary.